Introduction
NuageNetworks allows for the flexible mapping of virtual machines and bare metal servers to tenant networks. Within an OpenStack environment, the Ironic project handles the management of bare metals. In this application note, the high level architecture and workflow will be described, followed by how you can setup the integration yourself and attach your own bare metal to an OpenStack Tenant subnet.
To demonstrate the integration Openstack Liberty (OSP8) will be used in combination with Nuage Networks VSP 4.0R8. Please check with your Nuage Networks sales representative if you are looking for another combination as this might impact the steps slightly.
Architecture
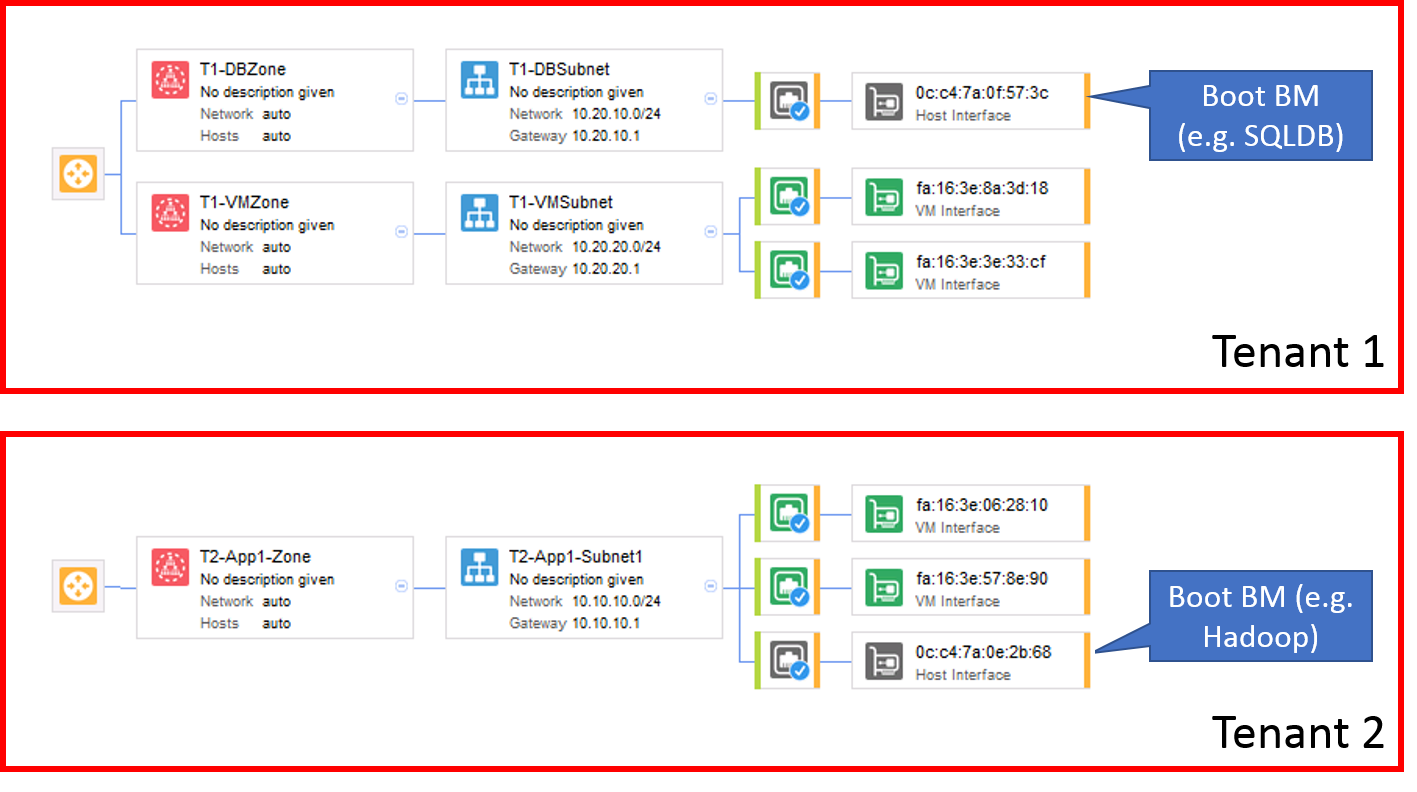
Target Domain Topology
The desired end goal is to model a couple of tenants that have a mixture of virtual machines and bare metals that are mapped into the same networking domain.
Components involved
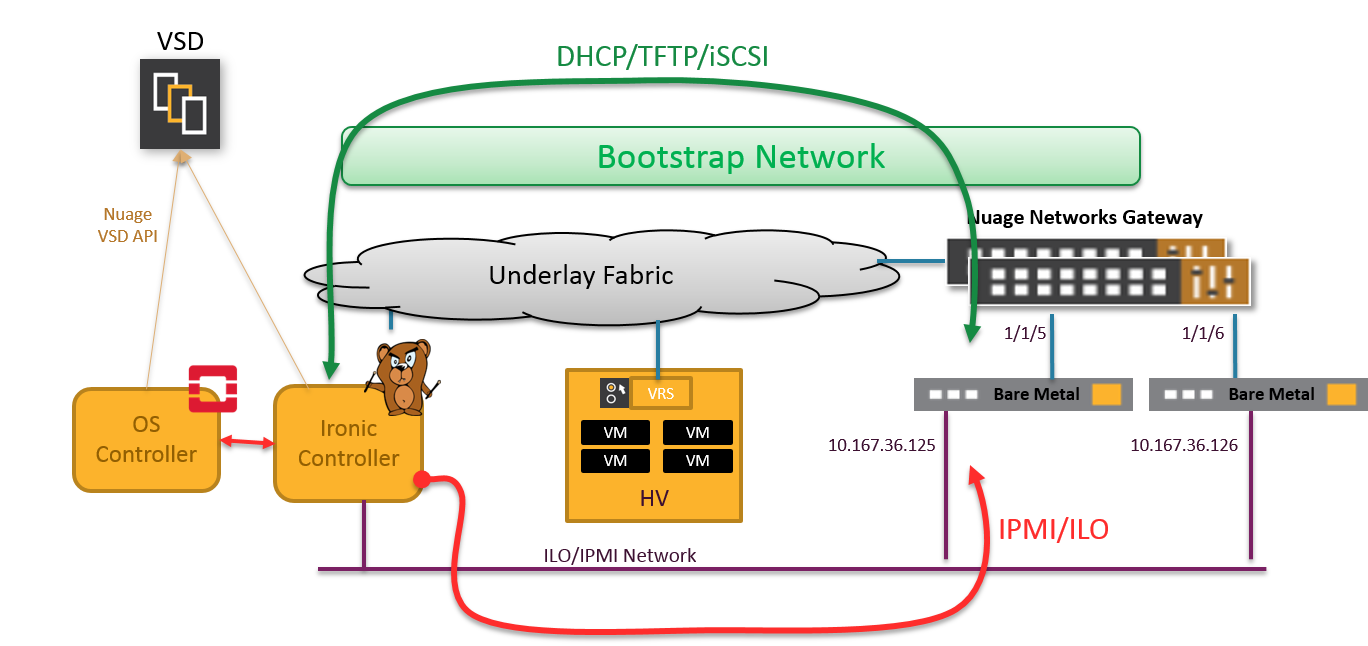
The components involved in this setup are shown below.

Our setup used in this application note has following components
- Nuage Networks Virtual Services Platform
- VSD
- Compute servers with VRS
- 2 x 7850 Virtual Services Gateways, configured in a Redundancy Group
- OpenStack Ironic Controller, running all services related to the Openstack BareMetal service
- OpenStack controller, running all other OpenStack services
Openstack Ironic Controller
The Ironic Controller in the setup hosts all services related to the Openstack Bare Metal service. It provides support to manage and provision physical machines. It includes following components:
ironic-api: RESTful API that processes application requests by sending them to the ironic-conductor over remote procedure call (RPC).ironic-conductor: Adds, edits or deletes nodes; powers on and off nodes with ipmi or ssh; provisions, deploys and cleans bare metal nodes. It includes a driver to interact withironic-python-agent. In this note, thepxe_ipmidriver will be used.- TFTP server for transferring boot disk images to the Bare Metal Node.
- DHCP server for assigning dynamic IP addresses during the initial provisioning process.
The ironic-python-agent is a small python application that is embedded in a ramdisk that is distributed to the node at the time of initial deployment or cleaning. The agent exposes a REST API that Ironic for handling actions such as inspect, configure, clean and deploy images.
We will also be using diskimage-builder to help facilitate the creation of ramdisks and machine images, such as those running the ironic-python-agent.
Additionally, the Bare Metal service has certain external dependencies, which are very similar to other OpenStack services:
- A database to store hardware information and state. A simple approach is to use the same database back end as the Compute service. Another approach is to use a separate database back-end to further isolate bare metal resources (and associated metadata) from users. The latter approach is being utilized here.
- An oslo.messaging compatible queue, such as RabbitMQ. It uses the same implementation as that of the Compute service, but that is not a requirement.
Network Connectivity of the Ironic Node
The Ironic controller has typically three network interfaces:
- To access Nova/Glance/Neutron API servers via an Internal Network
- To access the ILO/IPMI interfaces of the bare metal servers via the IPMI Network
- To an overlay Bootstrapping Network to transfer the deployment and final images to the bare metal servers In the setup, the first two networks were combined in a single subnet. For redundancy, two VSGs are combined in a Redundancy Group with MCLAG-interfaces connected to the Bare Metals These were left out in the figures.
Bare Metal boot up process
The workflow to boot a server dynamically to a tenant network can be described in following two steps
Initial enrollment of the server as a node in Ironic
Each bare metal first has to be provisioned as an Ironic Node. This is an administrative task to ensure the Openstack Compute service sees the available hardware. After enrollment Ironic can use the IPMI interface of the bare metal server to power on/power off the machine and a user image can be transferred to the node. As part of the enrollment, properties such as boot method, switch network connection, IPMI address, etc. need to be provided.
1. Power up in Bootstrapping Network
The Ironic node will use the IPMI interface of a bare metal server to power on/power off the machine upon creation/deletion of a bare metal server. Initially, the bare metal server will be connected to a Bootstrapping Network. It will use PXE boot to get the deployment image from the Ironic node. Once booted, the deployment image will download and install the final user image.
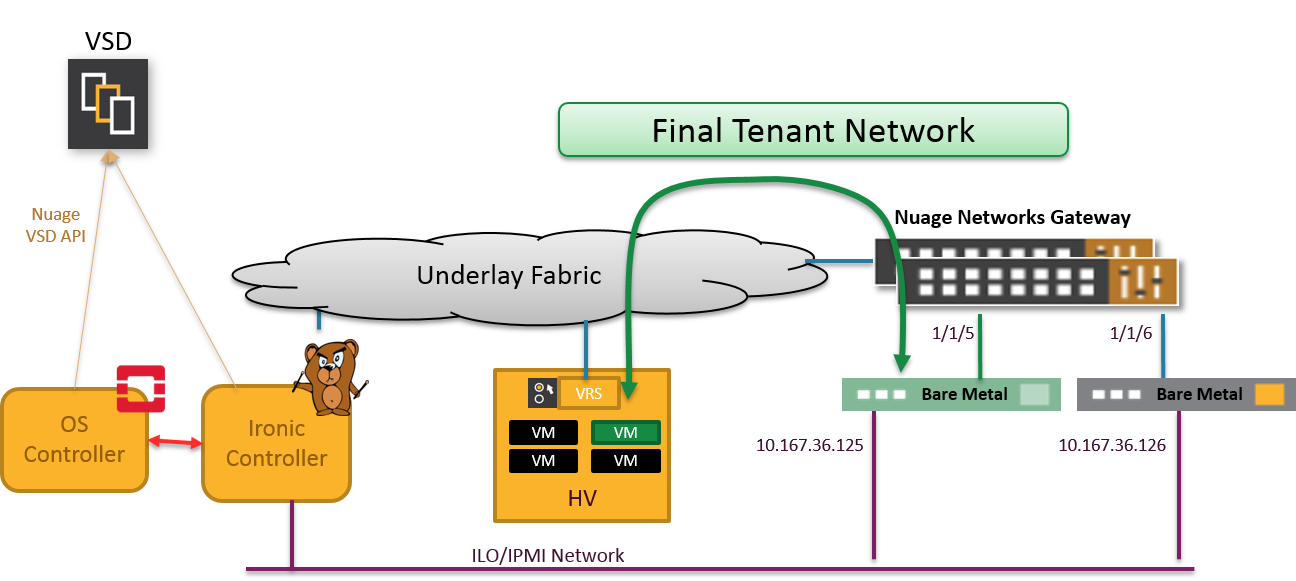
2. Mapping to Final Overlay Network
Once the final image is installed, the bare metal server is disconnected from the Bootstrapping Network and connected to the final overlay network, which can also contain virtual machines, containers, WAN services and more.
Ironic Integration steps with Nuage Networks VSP
To integrate OpenStack Ironic with Nuage Networks, following steps have to be followed:
- Preparation of Top-of-Rack switches
- Create Bootstrapping Network on OpenStack Controller
- Deploy Ironic Controller VM, incl creation of Ironic SQL Database
- Create Glance Disk Images and Nova Flavor
- Enroll an Ironic Node
Preparation of Top-of-Rack switches
Any port or lag on the VSG can be used for attachment of bare metals and mapping to a tenant network.
- The port or lag on the VSG needs to be configured with a
dynamic-service-profileto allow being programmed by VSD. - For a redundant connection from server to top-of-rack switches
- the pair of VSG needs to be configured as Multi-Chassis Redundancy Group
- LACP fallback is required for PXEBOOT to work
Configure dynamic service profile
A dynamic service profile needs to be assigned on all ports or lags that need to be programmed by VSD.
In the context of Ironic, usually untagged traffic is expected, but for future-proofness, a full open vlan range will be used.
*A:VSG-361>config>service>dynamic-services# info
----------------------------------------------
            port-profile "access-ports" create
                vlan-range 0-4094 mode push create
                exit
                no shutdown
            exit
----------------------------------------------
The same profile should be configured on VSG2.
Create the VSG redundancy group
Although not required, it is advised to configure two VSGs in a Multi-Chassis Redundancy Group for redundancy.
Follow section MultiChassis Link Aggregation Group of the Nuage Networks VSP User Guide to configure the VSGs. Create the needed lags in the VSD, but do not create the VLAN identifiers itself. This will be done by the Openstack services ìronic and neutron.
Configuring LACP fallback
In case of a redundancy group, LACP fallback is required. LACP fallback allows PXE boot by disabling one port of the lag if no LACP packets are received. Assign a lower port priority number on the VSG that is connected to the PXE enabled interface, to assure this interface will be used.
Make sure to set the timeout low enough. The timer starts to run when the server boots. The LACP fallback timer should expire before the DHCP timeout on the server.
VSG1 configuration
*A:VSG-361# \configure lag 5
*A:VSG-361>config>lag# info
----------------------------------------------
        encap-type dot1q
        port 1/1/5 priority 1
        dynamic-service-profile access-ports
        lacp active administrative-key 32769
        lacp-fallback timeout 10
        no shutdown
----------------------------------------------
VSG2 configuration
*A:VSG-362# \configure lag 5
*A:VSG-362>config>lag# info
----------------------------------------------
        encap-type dot1q
        port 1/1/5
        dynamic-service-profile access-ports
        lacp active administrative-key 32769
        lacp-fallback timeout 10
        no shutdown
----------------------------------------------
Following commands can be used for debugging. During PXE boot, LACP is in fallback mode
*A:VSG-361>config>lag# show lag 5 lacp-fallback
===============================================================================
LAG LACP Fallback Information
===============================================================================
LACP Mode               : active
Admin State             : up                      Oper State    : up
LACP Fallback           : enabled
LACP Fallback Port      : 1/1/5
LACP Fallback Timer     : 10 seconds
Curr Fallback Timer     : 0 seconds
LACP Fallback State     : In Fallback
MC Lag                  : Enabled
MC Peer Address         : 17.100.36.111           MC Peer Lag-id: 5

-------------------------------------------------------------------------------
Port-id        Adm     Act/Stdby Opr     Primary   Sub-group     Forced  Prio
-------------------------------------------------------------------------------
1/1/5          up      active    up      yes       1             -       1
-------------------------------------------------------------------------------
No. of LAG Ids: 1
===============================================================================
If LACP is configured on the final image, the status will be Out Of Fallback
*A:VSG-361# show lag 5 lacp-fallback

===============================================================================
LAG LACP Fallback Information
===============================================================================
LACP Mode               : active
Admin State             : up                      Oper State    : up
LACP Fallback           : enabled
LACP Fallback Port      : 1/1/5
LACP Fallback Timer     : 10 seconds
Curr Fallback Timer     : 0 seconds
LACP Fallback State     : Out Of Fallback
MC Lag                  : Enabled
MC Peer Address         : 17.100.36.111           MC Peer Lag-id: 5

-------------------------------------------------------------------------------
Port-id        Adm     Act/Stdby Opr     Primary   Sub-group     Forced  Prio
-------------------------------------------------------------------------------
1/1/5          up      active    up      yes       1             -       1
-------------------------------------------------------------------------------
No. of LAG Ids: 1
===============================================================================
Create Bootstrapping Network on Nuage VSD
The Bootstrapping Network is a simple network implemented as L2 domain that can be created on the OpenStack Controller or Nuage VSP. In this application note, we will use VSD Managed mode. The advantage of this is that ACLs or Security Groups are not configured automatically and do not consume system resources on VSG.
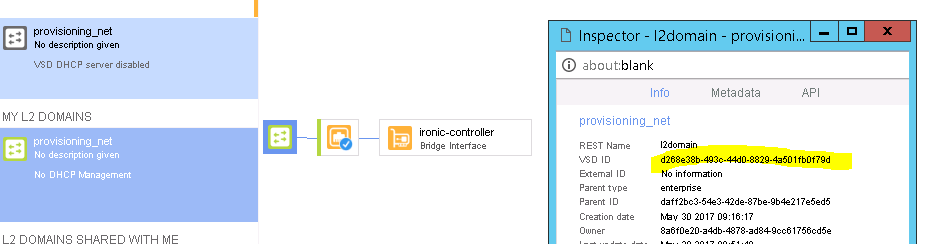
Once created, you can make it available to OpenStack admin project by using the UUID as nuagenet parameter:
neutron net-create provisioning_net
neutron subnet-create provisioning_net --name provisioning_subnet 192.168.0.0/24 --disable-dhcp --nuagenet d268e38b-493c-44d0-8829-4a501fb0f79d --net-partition Ironic_enterprise
The Ironic Controller has to be attached to this bootstrapping network. The simplest way is to create a VLAN (e.g. 0) on the gateway port (e.g. 1/1/2) which will connect the Ironic controller into this domain. In this application note, 192.168.0.1 was chosen as the IP of the Ironic Controller in this network.
# grep the id of the provisioning subnet:
provisioning_subnet_id=`neutron subnet-list | grep provisioning_subnet | awk '{ print $2 }'`

 In the VSD, create a VLAN (0 in example below) on the gateway port which will connect the Ironic controller into the provisioning subnet.

# From OpenStack, add this vlan id into the provisioning subnet.
ironic_gateway_port=`neutron nuage-gateway-vlan-show --gateway 17.100.36.110 --gatewayport 1/1/2 0 | grep id | awk '{print $4}'`

neutron nuage-gateway-vport-create --tenant-id admin --subnet $provisioning_subnet_id $ironic_gateway_port
Deploy Ironic Controller VM
The Ironic Controller can be deployed by following the instructions from https://docs.openstack.org/developer/ironic/liberty/deploy/install-guide.html
In this application note, the Ironic Controller will be deployed on a Centos 7.3 VM, with
- One interface to management network
- One interface via Linux bridge towards VSG
Install Openstack release package
# Install the Centos repo (in case of RDO)
yum install centos-release-openstack-liberty
Configure Keystone for Ironic Service
keystone user-create --name=ironic --pass=<kspass> --email=ironic@example.com
keystone user-role-add --user=ironic --tenant=services --role=admin
keystone service-create --name=ironic --type=baremetal --description="Ironic bare metal provisioning service"
keystone endpoint-create \
--service-id=the_service_id_above \
--publicurl=http://IRONIC_NODE:6385 \
--internalurl=http://IRONIC_NODE:6385 \
--adminurl=http://IRONIC_NODE:6385 \
--region=RegionOne
Install and configure OpenStack Ironic packages
For interworking between Nuage Networks and OpenStack Liberty, the upstream Ironic Packages had to be slightly patched by the Nuage team. As such gateway ports could be created on a per-tenant basis. For ease of installation, the Nuage Networks team have repackaged the Ironic components, so they could be installed with:
yum localinstall openstack-ironic-common-*_nuage.noarch.rpm
yum localinstall openstack-ironic-api-*_nuage.noarch.rpm
yum localinstall openstack-ironic-conductor-*_nuage.noarch.rpm
yum localinstall nuage-ironic-nova-*.noarch.rpm
yum install python-ironicclient
Set following parameters in ironic.conf:
[DEFAULT]
provisioning_network = 4f85e24e-06fc-4bd9-858c-8c0abcd1f1c8
network_provider = nuage
auth_strategy=keystone

[database]
connection=mysql+pymysql://ironic:<mysql_pass>@127.0.0.1/ironic?charset=utf8

[dhcp]
dhcp_provider=none

[keystone_authtoken]
auth_uri = http://10.167.36.62:5000/v2.0
identity_uri = http://10.167.36.62:35357
admin_tenant_name = services
admin_user = ironic
admin_password = <kspass>

[neutron]
url=http://10.167.36.62:9696

auth_strategy=keystone

cleaning_network_uuid=<provisioning_net>

[glance]
glance_host=10.167.36.62
glance_port=9292
glance_protocol=http
glance_api_insecure=True
auth_strategy=keystone

[oslo_messaging_rabbit]
rabbit_host = controller
rabbit_port = 5672
rabbit_hosts = controller:5672
rabbit_use_ssl = False
rabbit_userid = guest
rabbit_password = guest
rabbit_virtual_host = /
rabbit_ha_queues = False
heartbeat_rate=2
heartbeat_timeout_threshold=0

[conductor]
# IP of the Ironic Conductor in the provisioning subnet:
api_url=http://192.168.0.1:6385
Cleaning is a configurable set of steps, such as erasing disk drives, that are performed on the node to ensure it is in a baseline state and ready to be deployed to. This is done after instance deletion, and during the transition from a “managed” to “available” state. Cleaning is enabled by default:
[conductor]
clean_nodes=true
Install OpenStack Nova Compute component
The Ironic Conductor node also runs Nova Compute role since it is used as a scheduling input for any bare metal workloads.
yum install openstack-nova-compute
Edit /etc/nova/nova.conf – These parameters must be configured on both controller and compute node:
[DEFAULT]
compute_driver=nova.virt.ironic.IronicDriver
scheduler_host_manager=nova.scheduler.ironic_host_manager.IronicHostManager
compute_manager=ironic.nova.compute.manager.ClusteredComputeManager

[ironic]
# Ironic keystone admin name
admin_username=ironic
admin_password=<kspass>
admin_url=http://10.167.36.62:35357/v2.0
admin_tenant_name=services
api_endpoint=http://10.167.36.63:6385/v1
On the Ironic controller, configure following monkey patch in nova.conf:
[DEFAULT]
monkey_patch=true
monkey_patch_modules=nova.compute.manager:nuage_ironic_nova.nova.compute.manager.decorator,nova.network.neutronv2.api:nuage_ironic_nova.nova.network.neutronv2.api.decorator
Installing DHCP server on Ironic Controller
yum -y install dhcp
Edit /etc/dhcp/dhcpd.conf
default-lease-time 600;
max-lease-time 7200;

next-server 192.168.0.1;
filename "/pxelinux.0";

# this DHCP server to be declared valid
authoritative;
# specify network address and subnet mask
subnet 192.168.0.0 netmask 255.255.255.0 {
 # specify the range of lease IP address
 range dynamic-bootp 192.168.0.128 192.168.0.254;
 # specify broadcast address
 option broadcast-address 192.168.0.255;
}
Restart the dhcp server.
service dhcpd restart
Installing TFTP server
The Ironic Controller will also host a TFTP Server to enable the PXEBOOT process for any new Ironic Node. For further context, we refer here to the Newton guide as is more complete than the Liberty guide: https://docs.openstack.org/project-install-guide/baremetal/newton/setup-drivers.html
mkdir -p /tftpboot
chown -R ironic /tftpboot

sudo yum install tftp-server syslinux-tftpboot xinetd

vi /etc/xinetd.d/tftp

service tftp
{
  protocol        = udp
  port            = 69
  socket_type     = dgram
  wait            = yes
  user            = root
  server          = /usr/sbin/in.tftpd
  server_args     = -v -v -v -v -v --map-file /tftpboot/map-file /tftpboot
  disable         = no
  # This is a workaround for Fedora, where TFTP will listen only on
  # IPv6 endpoint, if IPv4 flag is not used.
  flags           = IPv4
}

systemctl restart xinetd

cp /boot/extlinux/chain.c32 /tftpboot

# Create map file
echo 're ^(/tftpboot/) /tftpboot/\2' > /tftpboot/map-file
echo 're ^/tftpboot/ /tftpboot/' >> /tftpboot/map-file
echo 're ^(^/) /tftpboot/\1' >> /tftpboot/map-file
echo 're ^([^/]) /tftpboot/\1' >> /tftpboot/map-file

cp -v /usr/share/syslinux/pxelinux.0 /tftpboot
cp -v /usr/share/syslinux/menu.c32 /tftpboot
cp -v /usr/share/syslinux/memdisk /tftpboot
cp -v /usr/share/syslinux/mboot.c32 /tftpboot
Create Ironic SQL database
In this setup, the Ironic SQL database will be installed on the Ironic Controller to ensure full isolation from the rest of the Openstack services.
yum -y install mariadb-server mariadb

systemctl start mariadb
systemctl enable mariadb

mysql -e "CREATE DATABASE ironic CHARACTER SET utf8; "
mysql -e "GRANT ALL PRIVILEGES ON ironic.* TO 'ironic'@'localhost' IDENTIFIED BY ‘<mysql_pass>’;"
mysql -e "GRANT ALL PRIVILEGES ON ironic.* TO 'ironic'@'%' IDENTIFIED BY  '<mysql_pass>';"

# Create the database schema
ironic-dbsync --config-file /etc/ironic/ironic.conf create_schema
Activate Ironic
After setting up the Ironic Controller VM, the Nova Scheduler has to be restarted and on the OpenStack controller, execute
service openstack-nova-scheduler restart
On Ironic compute, execute
service openstack-nova-compute restart
Note: After restarting the compute service, the nova logs can show following error: No compute node record for host <ironic node>. This will be resolved after the enrollment process.
Creating the Glance disk images and Bare Metal Nova Flavor
Given the end user will use Nova to boot his/her bare metal through Nova, a Glance disk image is required (supported by a kernel and initrd images). This will be referred to as my-image.
Also an Ironic Python Agent Image is required to facilitate actions such as inspect, configure, clean and deploy images.
Detailed instructions are on https://docs.openstack.org/developer/ironic/liberty/deploy/install-guide.html#image-requirements and https://docs.openstack.org/developer/ironic/liberty/deploy/install-guide.html#building-or-downloading-a-deploy-ramdisk-image
Create user image
yum install diskimage-builder --disablerepo="*" --enablerepo="centos-openstack-liberty"
mkdir diskimage; cd diskimage/

# A "devuser" with password "secret" on the image can be created for debugging.
export DIB_DEV_USER_USERNAME="devuser"
export DIB_DEV_USER_PASSWORD="secret"
export DIB_DEV_USER_PWDLESS_SUDO="yes"
disk-image-create centos7 baremetal dhcp-all-interfaces grub2 devuser -o my-image

# Add the images to glance
glance image-create --name my-kernel --visibility public --disk-format aki --container-format aki < my-image.vmlinuz
kernel_id=`glance image-list | grep my-kernel | awk '{print $2}'`

glance image-create --name my-image.initrd --visibility public --disk-format ari --container-format ari  < my-image.initrd
ramdisk_id=`glance image-list | grep my-image.initrd | awk '{print $2}'`

glance image-create --name my-image --visibility public --disk-format qcow2 --container-format bare --property kernel_id=$kernel_id --property  ramdisk_id=$ramdisk_id  < my-image.qcow2
Note: In case of MC-LAG, the user image should have a LAG with LACP configured. Creation of such an image is out of scope of this guide.
Create IPA deploy image
The Ironic Python Agent used in this application note is the one supplied by TripleO project. For this, download ironic-python-agent.tar and ironic-python-agent.tar.md5 from https://buildlogs.centos.org/centos/7/cloud/x86_64/tripleo_images/liberty/delorean/
Verify the checksum, unpack and run following commands to add them into glance.
glance image-create --name deploy-vmlinuz --visibility public \
--disk-format aki --container-format aki < ironic-deploy.kernel
glance image-create --name deploy-initrd --visibility public \
--disk-format ari --container-format ari < ironic-deploy.initramfs

deploy_kernel=`glance image-list | grep deploy-vmlinuz | awk '{print $2}'`
deploy_ramdisk=`glance image-list | grep deploy-initrd | awk '{print $2}'`
Create Nova Flavor
Finally the Nova flavor has to be created as well. Since PXE boot is only possible in the bootstrap network and not in the tenant network, the local boot option has to be set.
nova flavor-create my-baremetal-flavor auto 1024 100 2  # 1024 Mb ram, 100 Gb disk and 2 CPU
nova flavor-key my-baremetal-flavor set cpu_arch=x86_64
nova flavor-key my-baremetal-flavor set capabilities:boot_option="local"
Enrollment process
From https://docs.openstack.org/developer/ironic/liberty/deploy/install-guide.html#enrollment
# test IPMI access
ipmitool -I lanplus -H 10.167.36.125 -U ADMIN -P ADMIN chassis power status
Chassis Power is on
in
# Create node, e.g for server6
ironic node-create -d pxe_ipmitool -n server6

# Update flavor, ipmi address/username/password, and deploy images:
ironic node-update server6 add properties/cpus=2 properties/memory_mb=1024 properties/local_gb=100 properties/cpu_arch=x86_64 properties/capabilities="boot_option:local" driver_info/ipmi_address=10.167.36.126 driver_info/ipmi_username=ADMIN driver_info/ipmi_password=ADMIN driver_info/deploy_kernel=$deploy_kernel driver_info/deploy_ramdisk=$deploy_ramdisk

# create ironic port with MAC address of the PXE interface
node_uuid=`ironic node-list | grep server6 | awk '{print $2}'`
ironic port-create -n $node_uuid -a 0c:c4:7a:0f:57:3c

# get UUID of this port
port_uuid=`ironic port-list | grep 0c:c4:7a:0f:57:3c | awk '{print $2}'`

# update this port with the right VSG (pair) port information
ironic port-update $port_uuid add extra/gateway_name=VSG-pair extra/gateway_port=lag-6 extra/gateway_vlan=0
Boot Image
Finally, an image can be booted using a traditional Nova boot command, including options for the flavor and the desired tenant network it should be attached to:
# Boot image
nova boot BM.1 --image my-image --flavor my-baremetal-flavor --nic net-id=<uuid of final network>
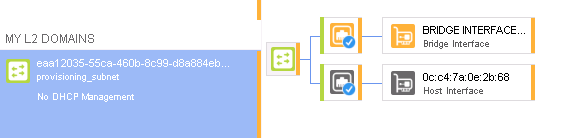
During the process, we can see the new baremetal in the bootstrapping network
After booting (this can take a while), you can verify the ironic node:
ironic node-validate server6
+------------+--------+---------------------------------------------------------------+
| Interface  | Result | Reason                                                        |
+------------+--------+---------------------------------------------------------------+
| boot       | True   |                                                               |
| console    | False  | Missing 'ipmi_terminal_port' parameter in node's driver_info. |
| deploy     | True   |                                                               |
| inspect    | None   | not supported                                                 |
| management | True   |                                                               |
| power      | True   |                                                               |
| raid       | None   | not supported                                                 |
+------------+--------+---------------------------------------------------------------+
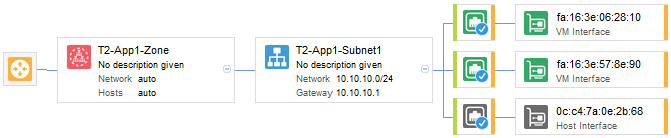
And this is now visible in the Nuage Networks VSD as follows
Conclusion
Through this application note we have demonstrated the use of the OpenStack BareMetal Service (Ironic) in combination with NuageNetworks VSP. Combining the two, an end-user can flexilby boot up a bare metals in its own tenant network without requiring any preprovisioning of the provider. It provides distributed routing, full isolation from other tenants, and does not require a centralized network node for routing to the rest of the tenant infrastructure.