Introduction
Nuage Networks VSP can both be used in greenfield and brownfield situations. In this blog, we will demonstrate how you, as an operator, can migrate the networks of your existing VMware ESXi datacenter into overlay networks from Nuage Networks with minimal impact.
It is assumed the initial topology looks like one of the diagrams below:
The key requirements we have set ourselves for this migration are
- Preservation of IP Address on the VM
- Support for Gradual VM Migration, without down-time for the VM
- Support for mixed subnets : subnets can have BareMetals and Virtual Machines
- In case the routing point can be moved (Scenario 1), migrated VMs must be able to benefit from Nuage’s distributed routing implementation
To ensure VMs can be migrated gradually and to enable a permanent VM-to-BM connection, this procedure will rely on a VXLAN Gateway. Such a VXLAN gateway can be based on VRS-G, 7850 VSG or Nokia’s 7750, a 3rd party gateway that supports L3 VTEP functionality.
The procedure we came up with consists of following steps:
- Network Preparation
- Installation of VXLAN Gateway
- Design Network Topology in Nuage VSP
- In case the routing point can be moved (Scenario 1), migrate Gateway IP(s)
- In-Place VM Migration
- Deploy VRS-VM
- Pre-provision Nuage Metadata
- VM Portgroup Update
What you can see from these steps, is that the actual stitching of the VM into a Nuage L2/L3 subnet relies on updating the PortGroup. It does not require a separate cluster or separate set of hypervisors: it is an in-place process that does not even involve vMotion.
With that, let us investigate each of these steps in further detail.
Step 1 - Network Preparation
Deploying the Underlay Network and VXLAN Gateway
The network preparation starts with the deployment of an underlay network across the existing physical estate and the installation of a VXLAN gateway. The underlay network is used to carry all the VXLAN traffic and is interconnecting all VRS and L2/L3 VTEPs. It typically does not change anymore after initial deployment. The VXLAN gateway is a VTEP extending subnets between existing and Nuage-Backed networks. The VXLAN gateway is typically connected on-a-stick to the main router and carries
- All VLAN that are to be migrated or that need extension in the Nuage environment
- A Transit Uplink VLAN (point-to-point subnet) over which Nuage-outgoing/incoming traffic will be sent
- A VLAN that will be used to carry the VXLAN traffic from the gateway to the hypervisors behind the original router. This could be switched/routed.
An alternative to sending back the Transit Uplink traffic over the same link is to have a separate link from the VXLAN GW into the Global DC Network. This is often done when migrating a L3 leaf-spine fabric or when interconnecting to other sites.
Designing Network Topology in VSP
After preparing the physical network, the operator needs to define the network topology in VSP. All networks can already be provisioned in there as a placeholder for later migration.
For the first scenario the gateway IP will be migrated onto Nuage, so we opt for a L3 domain where the definition of subnets and gateway addresses corresponds to the current ones.
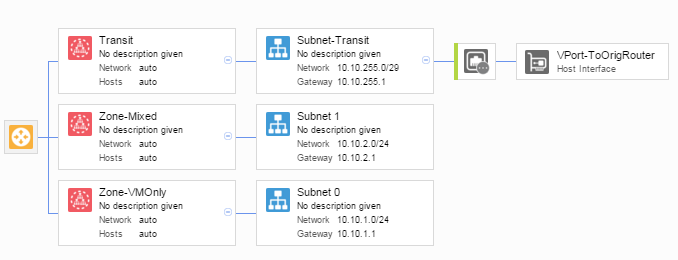
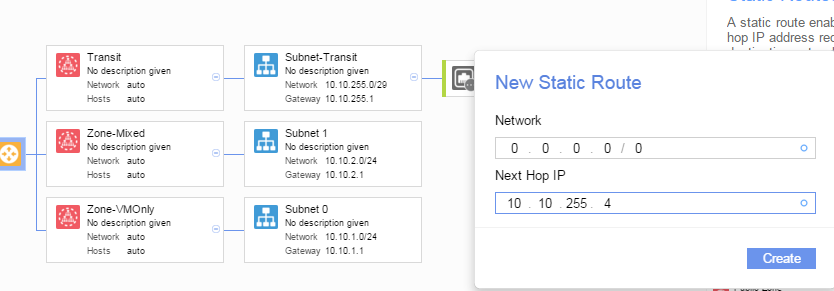
A “Transit” subnet is defined that makes the interconnection with the global DC network. A static route is also defined on the domain level to steer all traffic for different subnets over this transit link
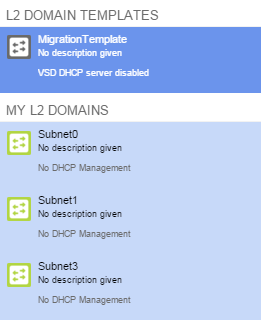
In the second scenario (no change of routing topology), we will opt for a set of L2 domains that match one-to-one to each subnet. No IP addressing plan is defined since Nuage will only take care of L2 forwarding.
Migrating Gateway IP(s)
When Nuage VSP takes care of the distributed routing between Virtual Machines, you can either change the routing configuration on the VM or migrate the VM. Usually operators prefer to migrate the gateway IP since this involves less change on the guest VMs.
The simple steps on how to do this:
- Remove the IP Interface on the original router (ie. removing the IP address from VLAN)
- Adding a VPort Bridge to the subnet in the Nuage. Any ARP request for the gateway IP by the VMs/BMs will be answered by Nuage.
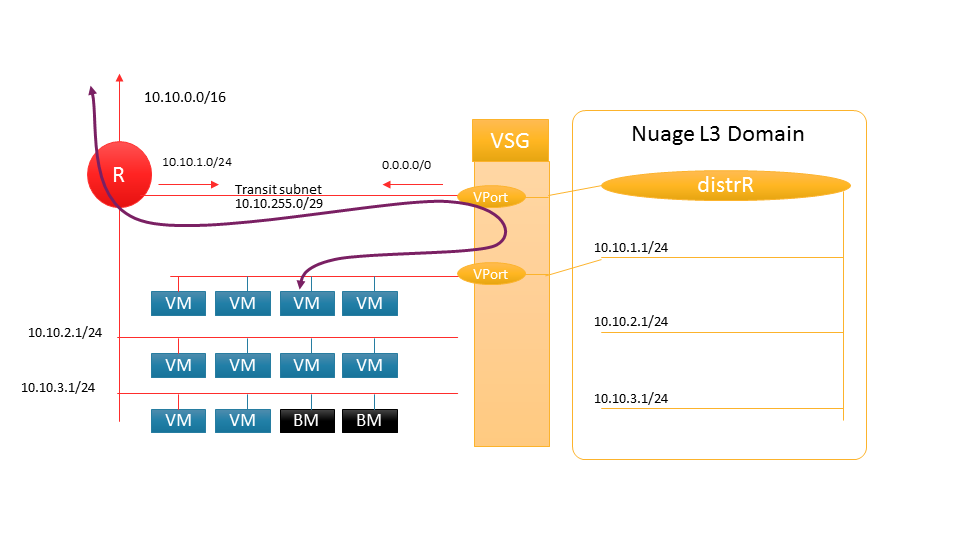
- Adding a static route to the original router to steer all traffic of the subnet to Nuage over the transit subnet.
Within a Nuage Domain, the configuration will look as follows:
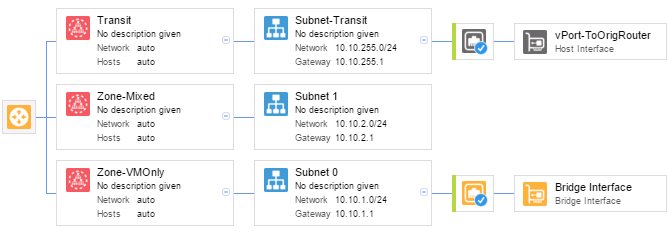
After this step, the traffic flow will have changed and will be as follows:
Note that dynamic routing can be supported when using a 7750 (V)SR or when using GRT domain leaking on VSG.
Step 2: In-Place VM Migration
After having prepared the network, the operator can start the actual VM migration process. The process is an in-place migration. This effectively means that VMs do not have to be migrated to a different host, but just require the remapping to a different portgroup in ESXi
The process consists of
- Deploying VRS-VM on the hypervisor that hosts the VM that require migration to Nuage
- Pre-provision Metadata to map a VM into the right subnet
- Update Port Group for each VNic so that Nuage can map the VNic to a Nuage VPort and can enforce a policy
Steps 2 and 3 are described in full length here, but can easily be automated. Keep reading to find back the link…
Deploy VRS-VM
The VRS-VM needs to be deployed on all hypervisors that host VMs that need migration. Prior to deploying the VRS-VM a new dvSwitch needs to be provisioned in which all the VNICs of the VMs will be mapped. This is a Distributed vSwitch without uplink, and should have following PortGroups:
- Nuage OVSPG –Portgroup where the Nuage VRS-VM Access interface is mapped into as a trunk port.
- VM PortGroup: Portgroup where all regular VMs will be attached into.
A sample diagram is shown below, for a deployment across 3 hypervisors (3 xVRS), and a few VMs.
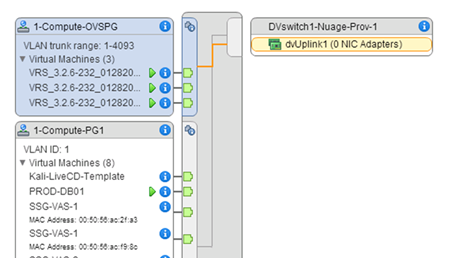
The deployment of VRS-VM can be done manually or through VCIN. Deploying a VRS-VM does not impact any traffic, nor does it map VMs into Nuage after this. It just prepares the hypervisor for managing VMs via Nuage. The screenshot below gives a view on the VRS-VMs as managed through VCIN.
As part of deploying VRS-VM, the access interface will be mapped into the OVSPG of the new dvSwitch
Pre-Provision Nuage metadata
For each VM that you like to have managed through Nuage, the relevant hooks have to be provisioned to link the VM to a Nuage subnet.
For bottom-up activation, this involves setting Advanced Configuration Parameters. This can be done via the vSphere Web/Desktop Client when the VM is powered down, or can be done through API or PowerCLI when the VM is powered up.

The full list of Advanced Settings are the following:
| Layer 3 | Layer 2 | Purpose |
|---|---|---|
| nuage.enterprise | nuage.enterprise | To specify an organization |
| nuage.user | nuage.user | To specify a user |
| nuage.nic#.domain | nuage.nic#.l2domain | To specify a domain |
| nuage.nic#.zone | To specify a zone | |
| nuage.nic#.network | To specify a subnet | |
| nuage.nic#.networktype | nuage.nic#.networktype | To specify a IPv4/IPv6 |
| nuage.nic#.ip | nuage.nic#.ip | To request a static IP address. Requested IP must be within the range of the specified subnet, and available. |
For split-activation, this involves pre-creating the VPort and Virtual Machine objects in Nuage VSD.
Update PortGroup
The final step in the migration is to update the PortGroup of the VNICs of the Virtual Machine to the VM PortGroup of the Nuage dvSwitch:
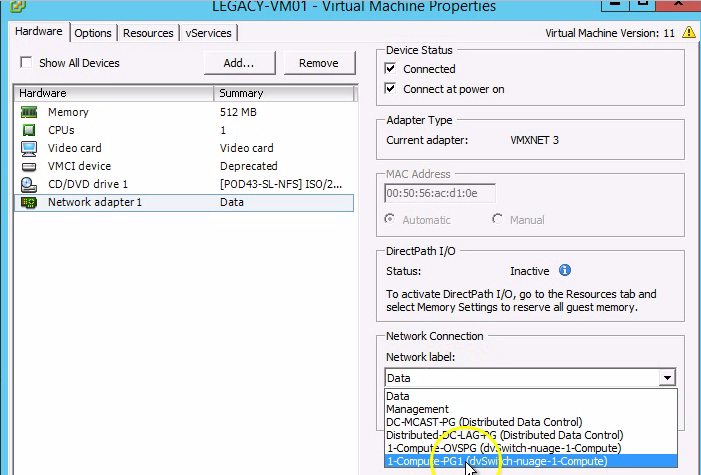
Once the update is done, VRS-VM will capture the event, request the network policy from VSD and wire the VM into the subnet or L2 domain that was provisioned inside the metadata. The VM can then ping the gateway IP, is able to ping the other VMs that are not migrated yet and will be able to ping the other BMs of the same subnet.
As mentioned before, the steps to migrate the VM can be fully automated: A migration script is available that includes metadata provisioning and that updates the ESXi Portgroup all for you!
Ping Test
As an example, we will show the result of a ping test between the VM and the Gateway IP during migration:
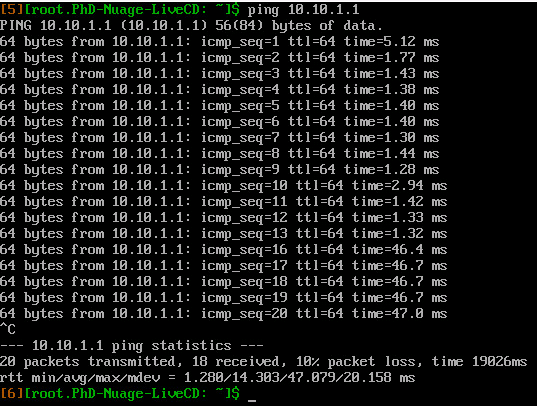
As can be seen in the result, there are 2 packets lost during the migration, so effectively resulting in approx 2s of network loss.
Network VPort Bridge Removal
For subnets that have their VMs fully migrated, it is recommended to remove the VPort Bridge from the subnet. In the example, this is to remove VPort Bridge from 10.10.1.0/24 subnet.
Final Setup
After migrating all VMs, the setup will look as follows for Scenario 1 (no migration of the gateway IP):
All virtual machines are part of a subnet within a L3 domain. Any inter-VM traffic will follow the shortest path across the fabric – no tromboning will happen through the original router. Any Nuage ACL firewall rules can be expressed between VMs, whether they are residing in the same or in different subnets.
In the second scenario, the gateway IP has not been migrated, so any inter-subnet routing will take place on the original firewall. Any Nuage ACL firewall rules can only be expressed between VMs within the same subnet.
Conclusion
In conclusion of this blog, I just like to re-iterate how smoothly the migration can actually take place in a ESXi environment:
- No change need to be made on the VM itself. VMs can keep running and connections will stay up during migration
- A VXLAN gateway is used to interconnect Nuage-backed subnets and legacy subnets. Depending on bandwidth/flexibility needs, Nuage Networks can work with different models in hardware (Eg 7850 VSG/ Nokia 7750 SR) or software (Eg VRSG)
- With Nuage, the operator can choose to leverage the distributed routing implementation of the Nuage platform, or to keep the routing infrastructure intact
A lot of the repetitive migration work can easily be automated. Many thanks go to Philippe Dellaert for developing this migration script and reviewing this blog.
Enjoy the Easter break !


