Introduction
This post will be all about how to launch docker containers inside your tenant network. Some may consider docker as a buzz technology, but with the 45,324 (and counting) images available on docker.hub it is definitely a technology to consider for any new application you may want to develop.
In a regular docker deployment a service can be exposed by mapping a external port of the host to an internal port of the docker container. A few things come to mind with this:
- How to administer all these ports when running a lot of those containers / services ?
- How to separate docker containers from different tenants or projects on a single host from a networking perspective ?
- How to connect docker services to a particular tenant in a multi-tenant cloud environment ?
Nuage Networks Solution
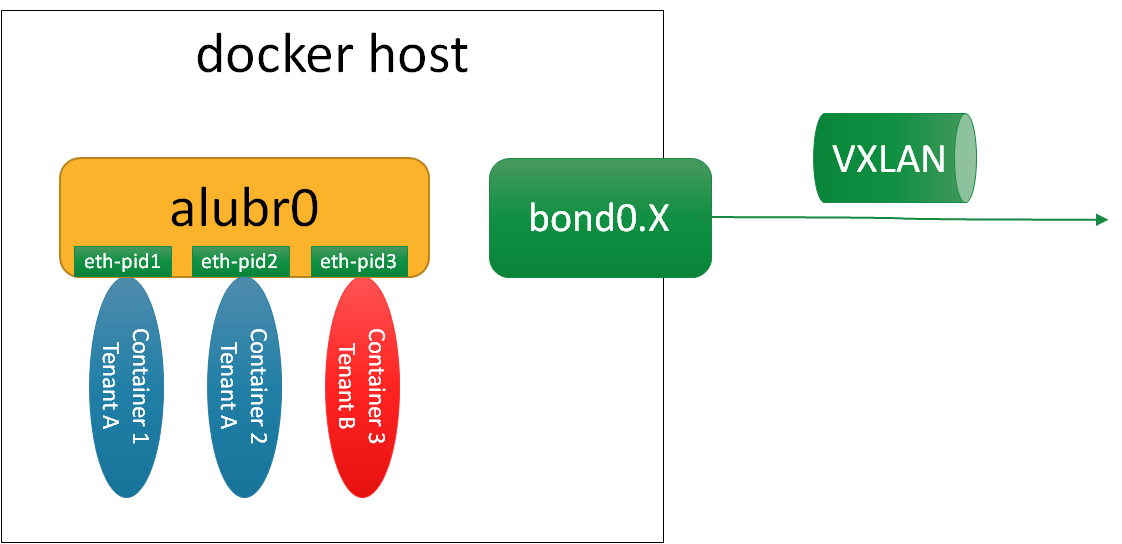
Nuage Networks actually provides an easy way to overcome these points. From an architectural point of view it will attach every container namespace to a tenant network. The tenant network itself is a virtualized network programmed by the Nuage VSD/VSC on the VRS (alubr0 bridge) installed on every docker host. Similar to policies programmed for virtual machines, similar policies can now be programmed for docker containers, specifying IP addressing, firewall rules, rate limiters, etc etc.
If traffic has to leave the host, it will similarly send out the VXLAN packet to the destiniation VTEP.
The following diagram shows this:

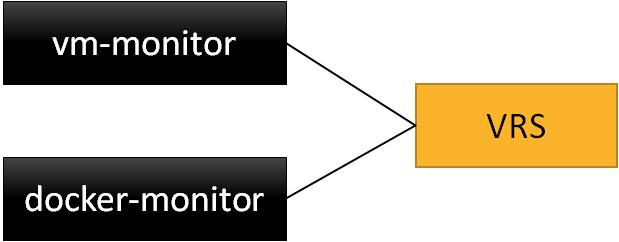
The attachment of a container into the alubr0 bridge is also similar to virtual machine attachments: a monitoring service listens to the vm/docker creation events and intercepts those. The service will read out the environment variables from the docker image or from the command line to query the correct policy from the VSC/VSD (this is known as bottom-up activation and available since R1 in Nuage). Based on these parameters the VRS will download the relevant network policy from the VSC/VSD and create the necessary interfaces on alubr0.

The advantage of this approach is that it makes the docker container part of a multi-tenant network infrastructure and it does not involve any port mapping rules.
Seeing it for yourself
Let’s look now at the different packages to install and steps to take to verify this. It assumes you have a working Centos 7 running, with the nuage-openvswitch package installed and connected to the VSC.
First install the necessary packages to convert the server into a docker host and to install the docker monitor:
[root@dockerhost ~]# pip install docker-py
[root@dockerhost ~]# yum install nuage-docker-monitor
[root@dockerhost ~]# sed -i "s/^PLATFORM=.*/PLATFORM=\"lxc,kvm\"/"  /etc/default/openvswitch
[root@dockerhost ~]# systemctl restart openvswitch
[root@dockerhost ~]# systemctl start docker
[root@dockerhost ~]# systemctl start nuage-docker-monitor
Then, Run a docker container
[root@dockerhost ~]# docker run -d --net=none  -e "NUAGE-DOMAIN=App1" -e "NUAGE-ZONE=DockerZone" -e "NUAGE-NETWORK=PrivateSubnet" -e "NUAGE-USER=user" -e "NUAGE-ENTERPRISE=DCEnterprise" training/webapp python app.py
[root@dockerhost ~]# docker ps
CONTAINER ID        IMAGE                    COMMAND             CREATED             STATUS              PORTS                     NAMES
1de973e730db        training/webapp:latest   "python app.py"     About an hour ago   Up About an hour                              adoring_babbage
As explained in the top section, we have to pass the Nuage variables that indicate the domain/zone/subnet information where to link the container into. This can also be described in the Dockerfile of the image or passed as a file. The important conclusion is that it can be described by any higher-level orchestration or automation engine. We also have to disable the native docker networking function (That’s if you use a Docker engine version prior to the inclusion of Libnetwork).
And time to verify connectivity !
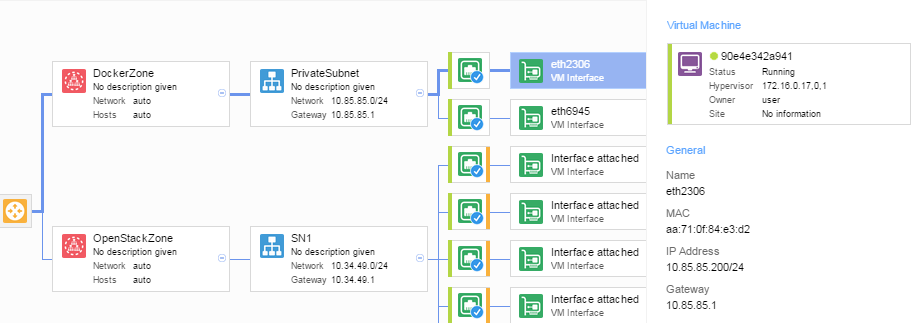
In VSD we can see that the docker got an IP address assigned, and got mapped into a zone of a domain with some VMs launched through OpenStack.

On the docker host I can see the container got an IP address assigned and can ping the default gateway or other VMs
[root@dockerhost ~]# docker exec 1de973e730db ip a
1: lo: <LOOPBACK,UP,LOWER_UP> mtu 65536 qdisc noqueue state UNKNOWN group default
    link/loopback 00:00:00:00:00:00 brd 00:00:00:00:00:00
    inet 127.0.0.1/8 scope host lo
        valid_lft forever preferred_lft forever
    inet6 ::1/128 scope host
        valid_lft forever preferred_lft forever
26: eth28738: <BROADCAST,MULTICAST,UP,LOWER_UP> mtu 1500 qdisc noqueue state UNKNOWN group default
    link/ether 62:f0:aa:9d:2b:a3 brd ff:ff:ff:ff:ff:ff
    inet 10.85.85.204/24 scope global eth28738
        valid_lft forever preferred_lft forever
    inet6 fe80::60f0:aaff:fe9d:2ba3/64 scope link
        valid_lft forever preferred_lft forever

[root@dockerhost ~]# docker exec 1de973e730db ping 10.85.85.1
PING 10.85.85.1 (10.85.85.1) 56(84) bytes of data.
64 bytes from 10.85.85.1: icmp_seq=1 ttl=64 time=60.0 ms
64 bytes from 10.85.85.1: icmp_seq=2 ttl=64 time=58.1 ms

[root@dockerhost ~]# docker exec 1de973e730db ping 10.34.49.2
PING 10.34.49.2 (10.34.49.2) 56(84) bytes of data.
64 bytes from 10.34.49.2: icmp_seq=1 ttl=62 time=44.4 ms
64 bytes from 10.34.49.2: icmp_seq=2 ttl=62 time=2.39 ms
And on the other OpenStack VM I can just verify that my docker service is accessible
[root@localhost ~]# ip a
1: lo: <LOOPBACK,UP,LOWER_UP> mtu 65536 qdisc noqueue state UNKNOWN
    link/loopback 00:00:00:00:00:00 brd 00:00:00:00:00:00
    inet 127.0.0.1/8 scope host lo
        valid_lft forever preferred_lft forever
    inet6 ::1/128 scope host
        valid_lft forever preferred_lft forever
2: eth0: <BROADCAST,MULTICAST,UP,LOWER_UP> mtu 1500 qdisc pfifo_fast state UP qlen 1000
    link/ether fa:16:3e:54:fa:a0 brd ff:ff:ff:ff:ff:ff
    inet 10.34.49.2/24 scope global eth0
        valid_lft forever preferred_lft forever
    inet6 fe80::f816:3eff:fe54:faa0/64 scope link
        valid_lft forever preferred_lft forever

[root@localhost ~]# wget –qO- 10.85.85.204:5000
Hello world!
So by going through a few simple steps, I realized:
- I wouldn’t have to administer port mappings for my docker services
- I can separate docker containers in the same way as I separate virtual machines
- I can access my docker services from my Openstack VMs.
Life is good !