Introduction
If your Nuage VSP environment is integrated with VMware, then there’s a good chance you are using vRealize Orchestrator (vRO) to automate many of your networking tasks. The Nuage Networks VSP vRO Plugin operates within vRO to help you to manage your SDN by offering links to the Virtualized Services Directory (VSD) VSPK. In Part 1 of this series, we provide screenshots from vRO to accompany steps in the plugin’s installation guide and then walk through some examples of using the plugin to create, edit and remove a basic VSD object.
Product Overview
VMware is both a leader and pioneer in platform virtualization and cloud computing. The company offers many products and tools to their customers to manage these functions, from bare-metal hypervisors to automation and deployment tools. The VMware vRealize Suite is a complete Cloud Management Platform for managing an enterprise’s private and public cloud resources.
The VMware vRealize Orchestrator (vRO) tool integrates with the vRealize Suite to automate IT operations. It offers an easy-to-use interface to combine VMware specific functions and third-party functions into workflows that can then be executed manually, scheduled for later execution, triggered from an external script, or run automatically after notification of an external event. With vRO, a user could assemble a set of tasks into workflows that interface with vCenter, Active Directory, PowerShell and other endpoints.
In 2016, Nuage Networks announced the official release of its VSP vRO Plugin. You can read the announcement and find links to download the plugin here. Instructions to install the latest version of the plugin can be found in the ‘INSTALL.txt’ file at the Github repository here. See the Plugin Setup and Validation Section below for a visual companion guide to the written instructions found in the ‘INSTALL.txt’ file.
Once you have the plugin installed, you will have access to hundreds of workflows that perform basic CRUD operations against all of the VSD objects in your SDN. You can use these workflows in a stand-alone manner or embed them as components into larger, multi-step workflow processes. For example, a workflow to provision a new VM into your Nuage environment might require a step to create VSD Subnet object, followed by a step to update the VM’s network configuration in vCenter with the names of the newly created VSD objects and then a step to power-down, power-up and ping the VM.
VSD Setup
To use the VSP vRO Plugin, you will need to connect to a running VSD server with sufficient update permissions. You might already have access to a VSD test instance that is configured with admin credentials csproot/csproot, a default organization csp and a port number 8443. Please contact your network administrator to obtain adequate login and connection details.
A web interface called VSA (Virtualized Services Architect) uses the VSD RESTful API to provide a visual representation of the state of the VSD objects in your network. We will use VSA throughout this post to verify the results of workflows that we construct and execute using the VSP vRO Plugin.
To access the VSA, enter an appropriate address and port in your browser based on the network location of your local VSD. Your URL should resemble this :
https://198.51.100.108:8443/
If your VSD is running on the port that you have provided, you will see a login screen similar to this :
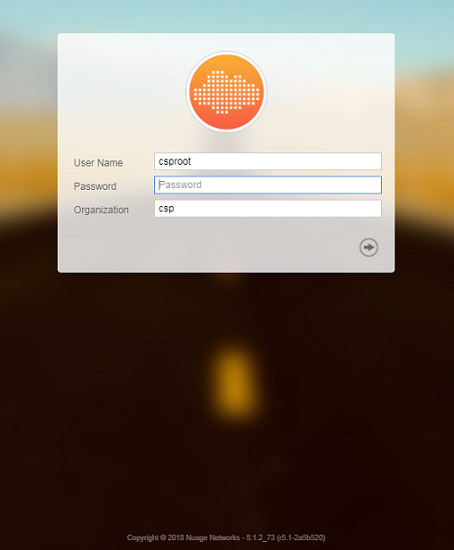
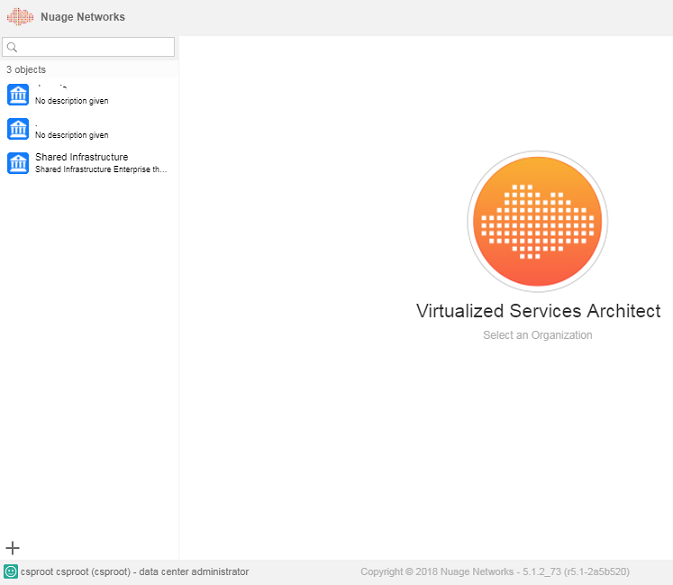
After entering valid credentials and organization, you will see a home page similar to this :
Plugin Setup and Validation
Instructions for installing the VSP Plugin are in the ‘INSTALL.txt’ file here. In this section, we offer accompanying screenshots to help you ensure that the plugin is installed and operating properly.
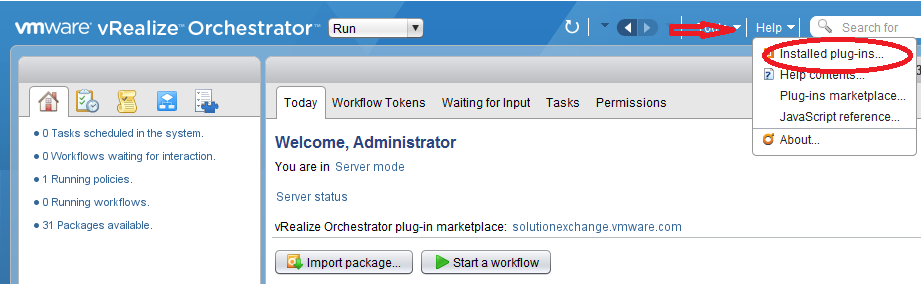
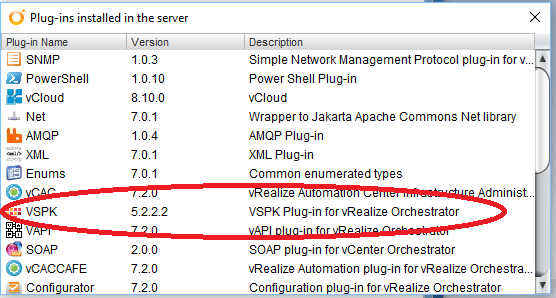
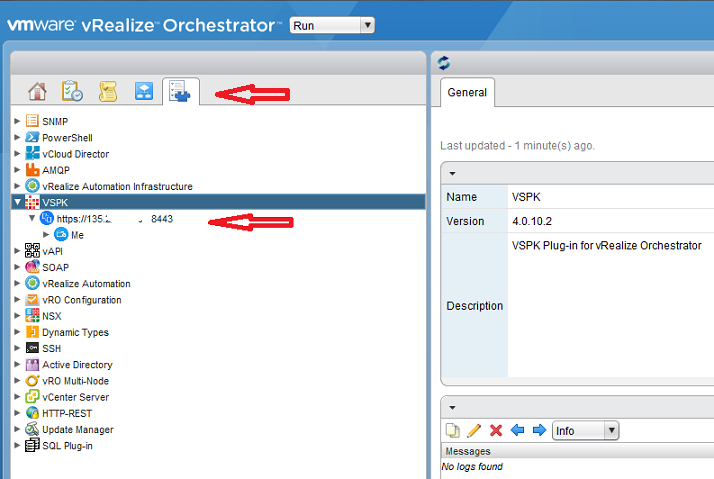
- Verify that the VSP plugin has been installed. It will be named
VSPKand have a description such asVSPK Plugin-in for vRealize Orchestrator. Log in to the VRO client and from the top-level menuHelpoption, select theInstalled plug-insoption from the Help menu. Ensure that the plug-in appears in the list of installed plugins :
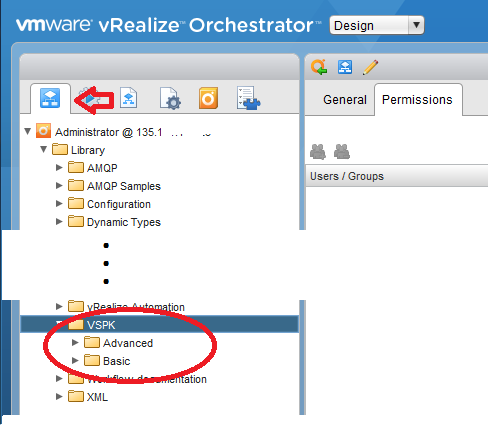
- The bundle of workflows that are provided with the plugin is known as the
Basicpackage. An additional package ofAdvancedworkflows is available here. To install the Advanced package, follow the instructions in the ‘INSTALL.txt’ file. Verify that the 2 packages are visible in your library. Select the workflow icon from the top menu, then expand theLibraryfolder, and theVSPKfolder. Two folders should appear calledBasicandAdvanced:
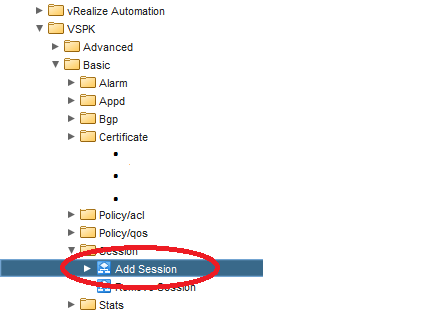
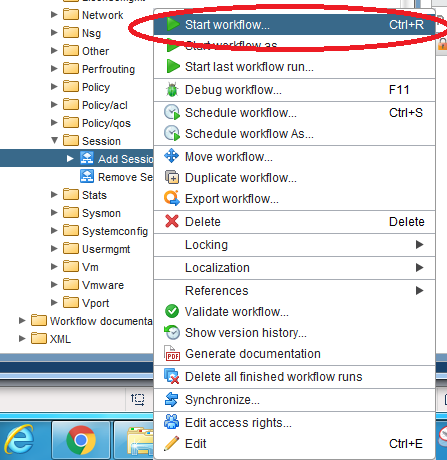
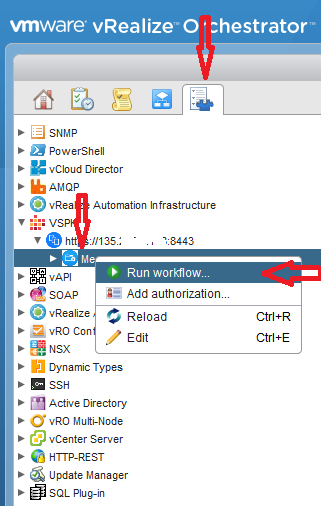
- Establish a secure HTTP connection to your VSD instance by using the VSP plugin to create a new session. This step is similar to creating a connection to a database before running SQL queries. From the
Basicfolder, right-click theAdd Sessionworkflow item and then select theStart workflowoption from the menu :
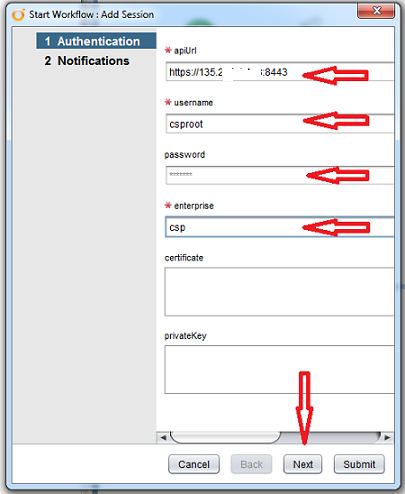
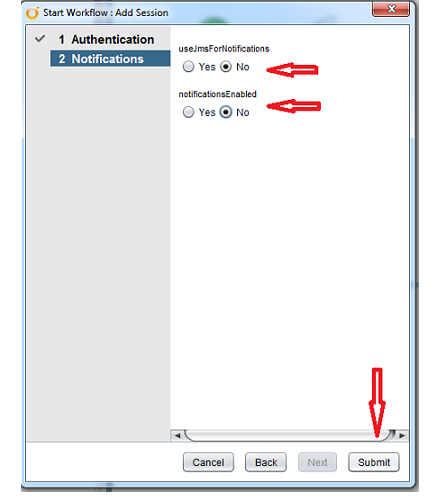
- A pop-up window appears into which 2 groups of parameters for the workflow must be supplied. For the Authentication group, enter the first 4 parameters with similar values to those used earlier for the connection to the
VSAand click theNextbutton. For the Notifications group, select ‘No’ for both parameters. Then click theSubmitbutton from the bottom menu :
- Verify that the new session has been added to the Orchestrator’s Inventory. Select the Inventory icon from the top menu and then expand the VSPK folder :
Use a Stand-alone Workflow
Once a VSD session has been created, it is automatically added to the vRO Inventory where it provides an entry point through which existing objects from the connected VSD instance are visible and associated workflows are executed.
The VSD models its objects as a tree structure with Parent-Child associations between pairs of objects. At the root of the tree is the Me object, which serves as a parent for many underlying child objects such as Enterprise, VCenter, and VM.
In this section, we will use a workflow provided by the VSP Plugin to create a new VSD Enterprise object.
- From the top-level Inventory menu option, expand the
VSPKfolder, then the VSD Session object. Right-click theMeobject and then click theRun workflow ...option from the pop-up menu :
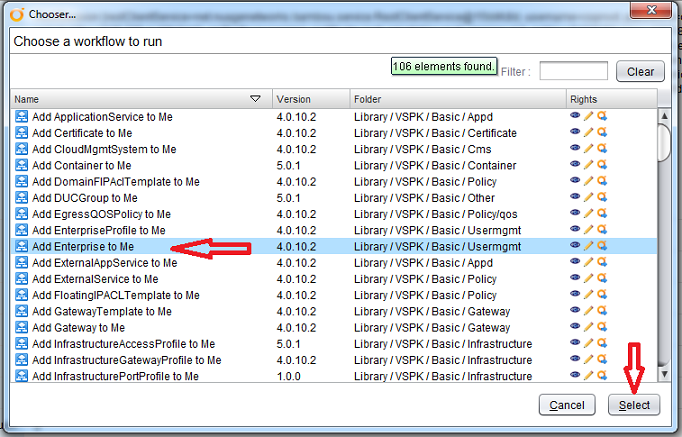
- Workflows associated with the
Meobject type are displayed in a separate “Chooser” dialog menu that appears when you right-click on the object. From the Chooser menu, locate theAdd Enterprise to Meworkflow by entering a search filter or sorting on the name column. Then execute the workflow by clicking theSelectbutton :
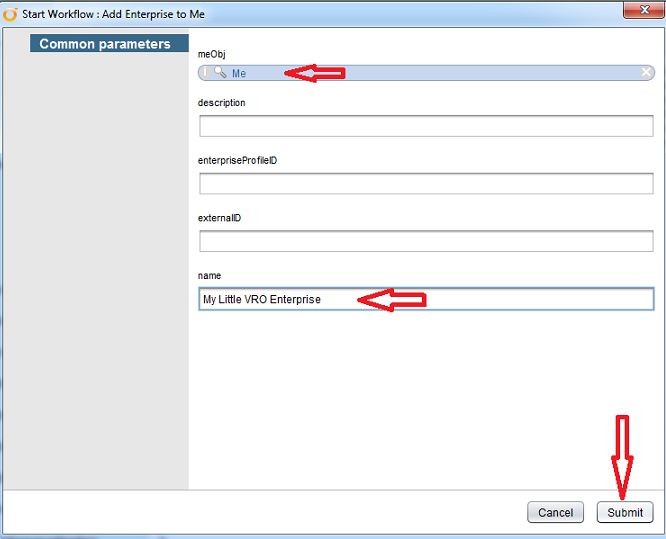
- A pop-up window appears into which 2 parameters required by the workflow can be entered. The first required parameter is a
Meobject value. In this case, theMeobject selected in Step 1 is provided by default. The second required parameter is a name for the proposed Enterprise object. EnterMy Little VRO Enterpriseas the Name value and then click theSubmitbutton :
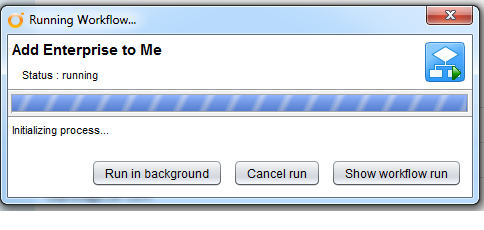
- A small pop-up window appears indicating that the workflow has begun exection :
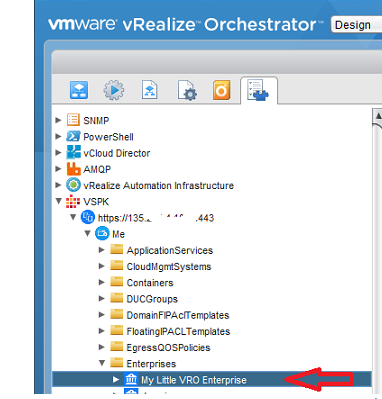
- If the workflow in the previous step completed successfully, then the new enterprise will be visible as an object in the VRO Inventory. Expand the
Meobject from the Inventory menu and then right-click theEnterprisesobject and select theReloadoption from the small pop-up menu. The most recent list of Enterprise objects from your instance of VSD will be displayed :

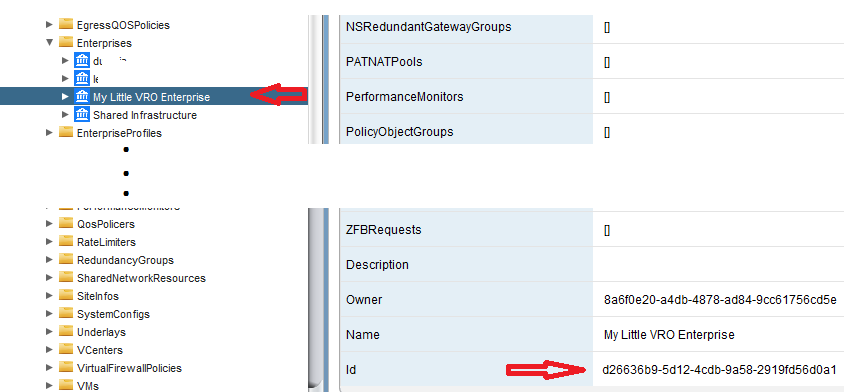
- When a VSD object is selected from the VRO Inventory menu in the left pane, its attributes are displayed in the right pane. For our purposes, we are interested in the ID attribute of the new enterprise object. It may be necessary to scroll the screen in order to find the ID attribute. Make note of the ID value as we will use it later as a validation item when we create custom workflows :
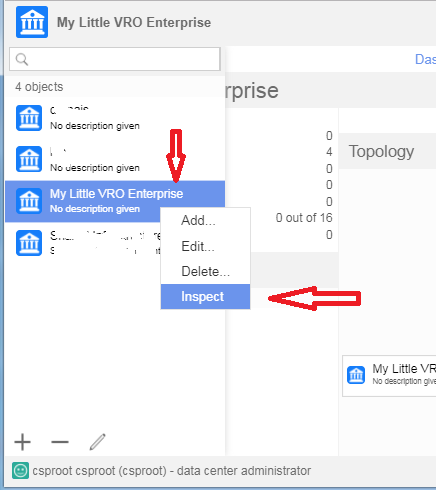
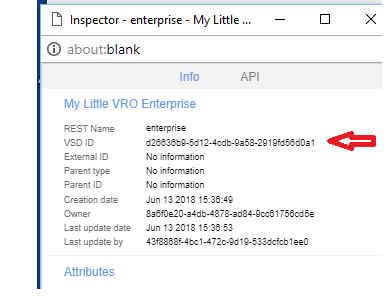
- The new enterprise will also be visible as an object in
VSA(Virtualized Services Architect), where its attributes can be displayed. Select the new enterprise object and then choose theInspectoption from the small pop-up menu. Ensure that the Enterprise ID value matches the value from the previous step :
Building a Custom Workflow
The Nuage Networks VSP vRO Plugin provides an extensive set of workflows that can perform basic maintenance tasks on VSD objects. In addition, those workflows can be combined with your own custom designed workflows to perform more complex tasks in your network environment.
In these next sections, we will design a custom workflow that invokes 3 Nuage VSP plugin workflows to find, edit and then delete the VSD Enterprise object that we created in the previous section.
Create the Custom Workflow
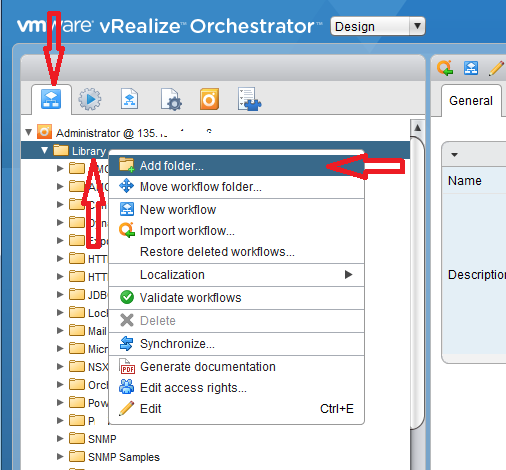
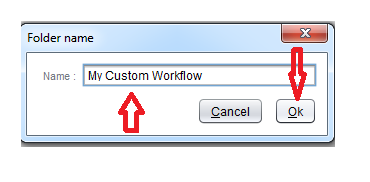
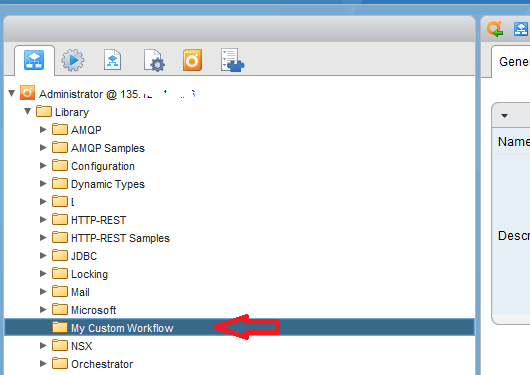
- To begin, create a workspace for your new custom workflow. From the top-level
Workflowmenu option, expand theAdministratorfolder and then expand theLibraryfolder below it. Right-click on theLibraryfolder and then select theAdd folderoption from the pop-up menu that appears. When prompted for a new folder name, enterMy Custom Workflowand then click theOkbutton :
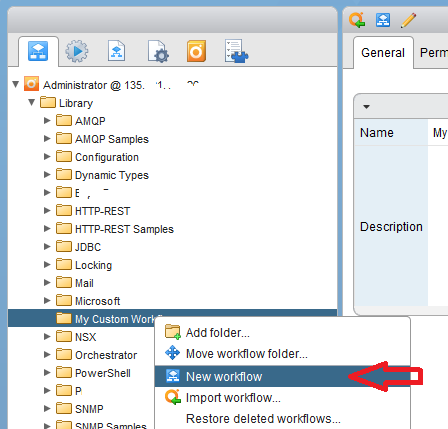
- The new folder will be displayed in the folder list in the left pane :
- Select the new folder and then right-click on it to display the pop-up folder options menu. Select the
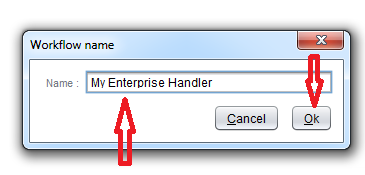
New workflowoption. When prompted for a new workflow name, enterMy Enterprise Handlerand then click theOkbutton :
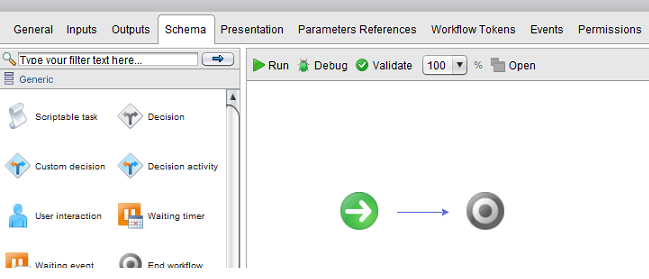
- The screen will convert to
Editmode for the custom workflow as shown below :
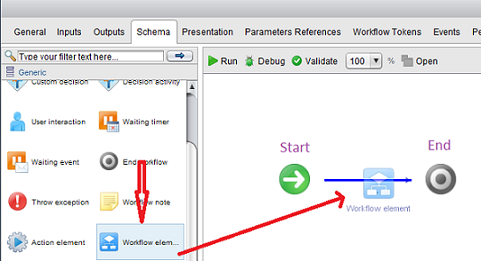
Add the 1st Workflow Element - Finding an Enterprise
- Remain on the
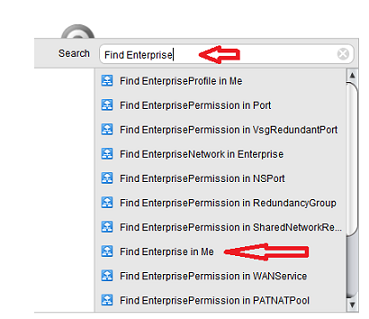
Schematab of the workflow editor and select theGenericmenu in the left pane. Drag theWorkflow elementfrom the group of Generic elements in the left pane to the workflow diagram in the right pane and release it between theStartelement andEndelement. When prompted for a Workflow name in the Search box, enter part or all of the stringFind Enterprise in Meand then double-click the workflow from the list to add it to the schema :
- Hover your mouse over the
Find Enterprise in MeWorkflow element to confirm details such as name and path :
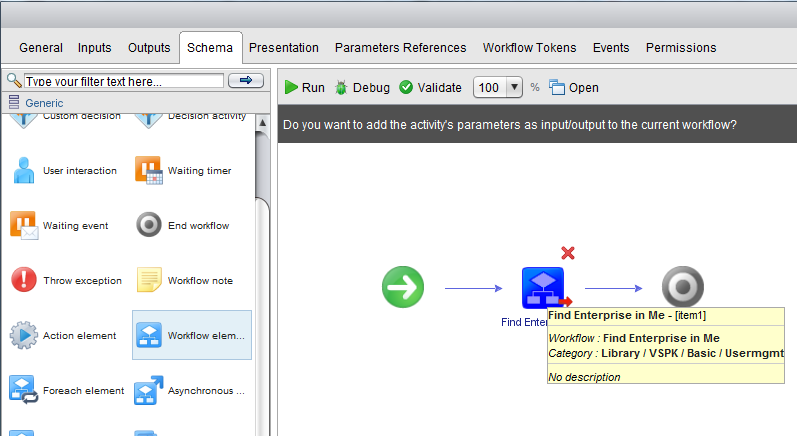
- The
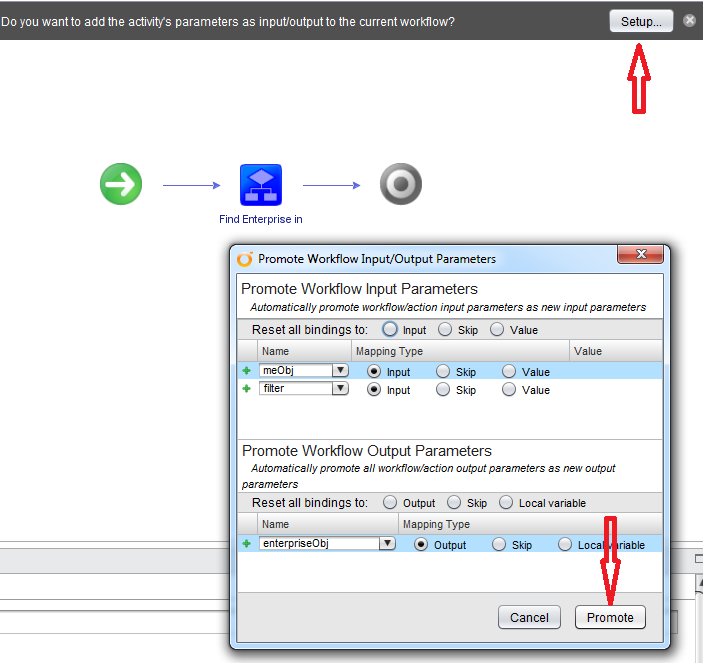
Find Enterprise in Meworkflow element that we are adding requires 2 input parameters and 1 output parameter. In response to the promptDo you want to add the activity's parameters as input/output to the current workflow, click on theSetupbutton. A pop-up screen will be displayed showing the types and names of the 3 parameters. Click on thePromotebutton to accept the default promotion behavior for all parameters :
Add the 1st Scriptable Task Element - Output Original Enterprise Name
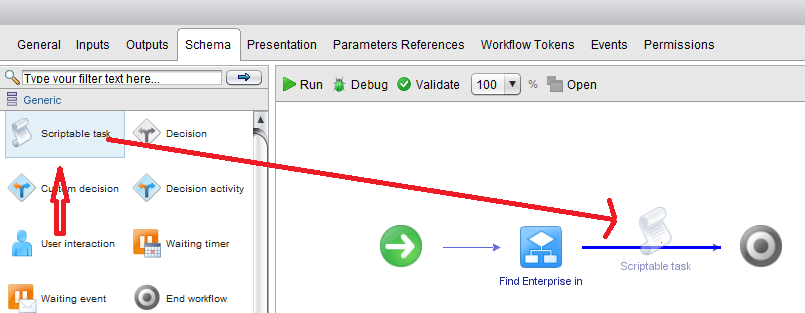
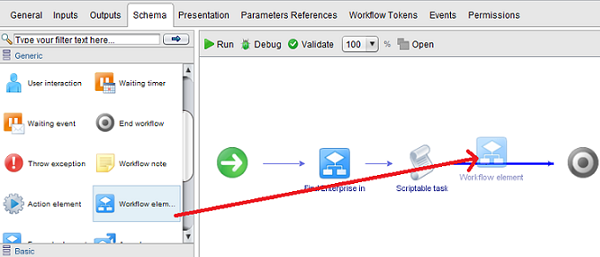
- In its current state, the custom workflow will use the plugin to locate a VSD Enterprise object, but there is nothing else in the workflow to utilize that object. Let’s add some code to output some attributes from that Enterprise object to the console. Drag the
Scriptable taskelement from the group of Generic elements in the left pane to the workflow diagram in the right pane and release it between theFind Enterprise in Meelement andEndelement :
- The screen will open additional panes at the bottom where you will be able to add JavaScript code. Select the
Scriptingmenu option and enter the code as shown :
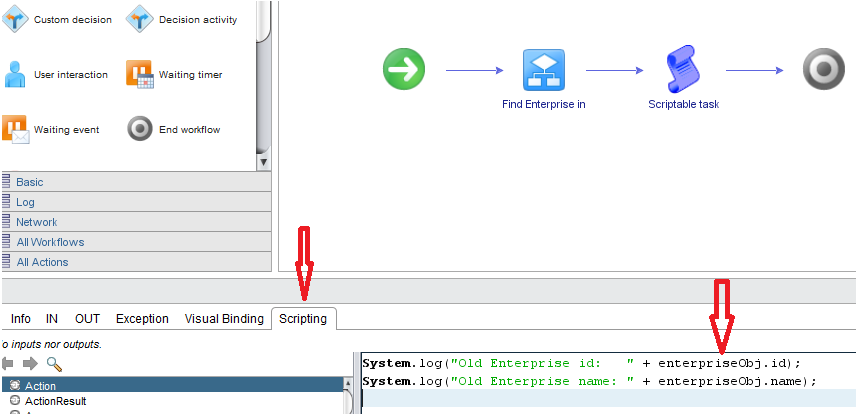
- The current JavaScript code refers to the output parameter named
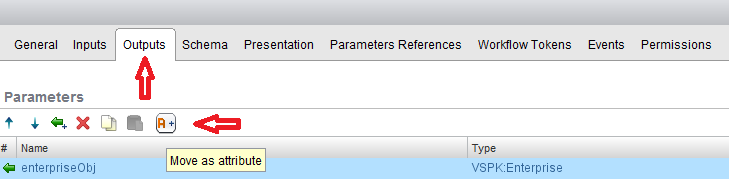
enterpriseObj. However, as an “output parameter”, VRO does not support its usage as an “input parameter” within the custom workflow. It must instead be converted to anAttribute, which can serve as an input or output value for all elements. To perform the conversion, select theOutputsoption from the top-level menu, and then select theenterpriseObjparameter. In theParameterssection, click theMove as attributebutton :
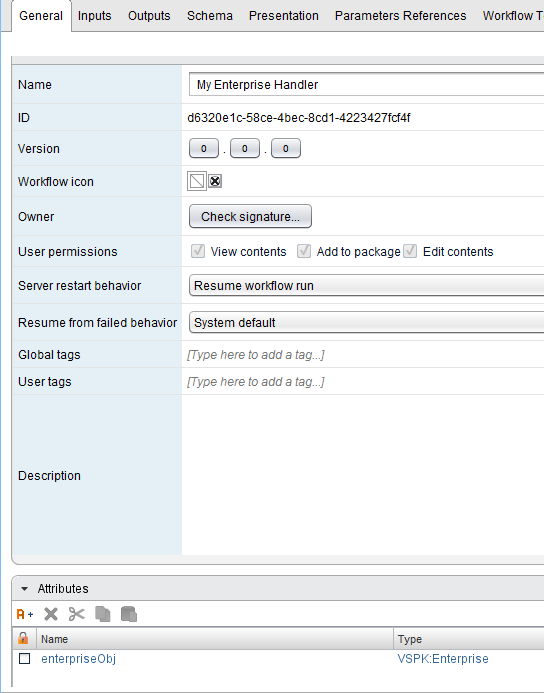
- The
enterpriseObjparameter is now visible as an Attribute on theGeneralmenu option :
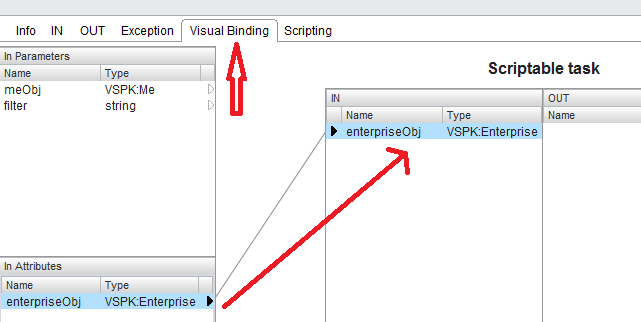
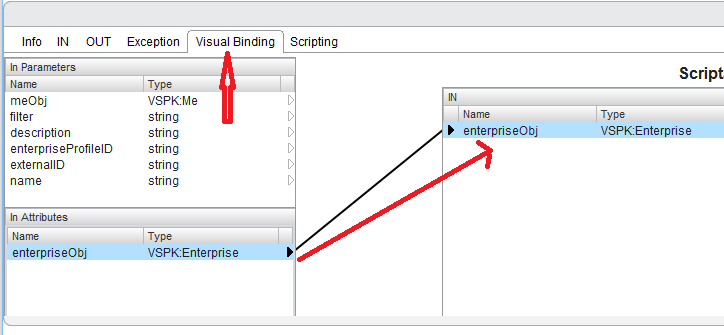
- You can now wire the new Attribute to the Scriptable Task. From the top-level menu, select the
Schemaoption and then click theScriptable taskelement. In the bottom pane, select theVisual Bindingoption. TheenterpriseObjparameter is now designated as anIn Attributeand can be used as input to your scriptable task :
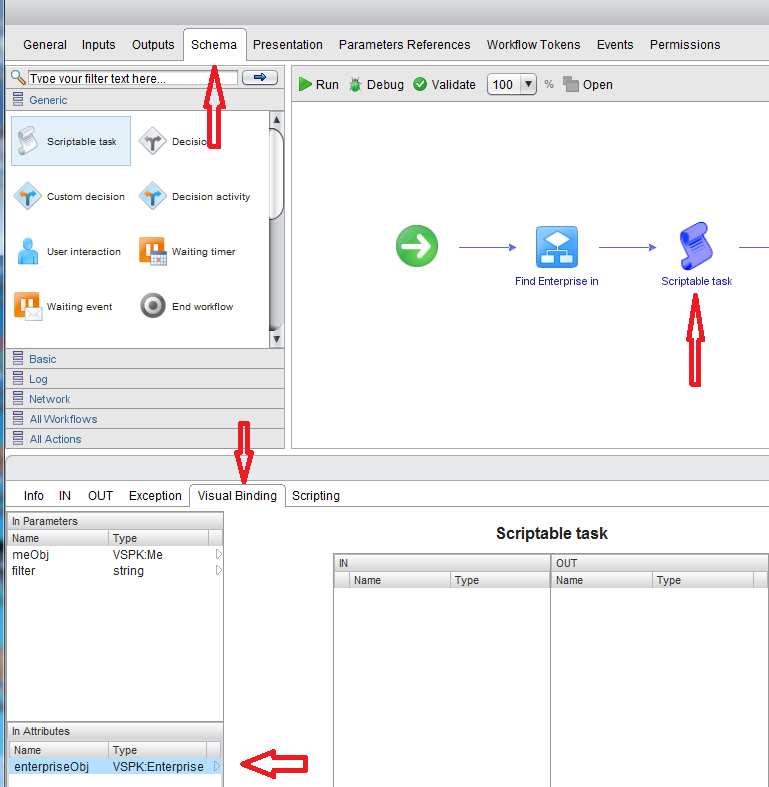
- Highlight the attribute and drag it from the
In Attributespanel to theINside of theScriptable taskpanel :
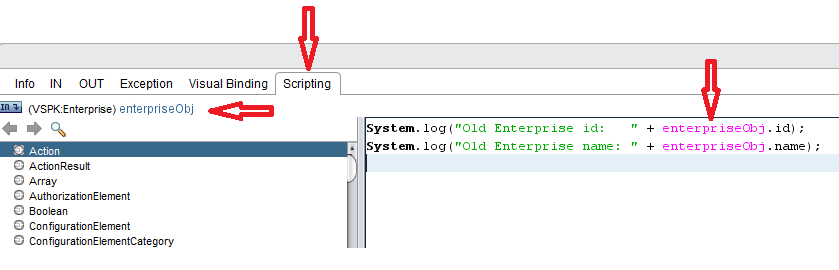
- Switch to the
Scriptingtab in the bottom pane. TheenterpriseObjis now confirmed to be a valid parameter and its occurrences in the JavaScript code change color :
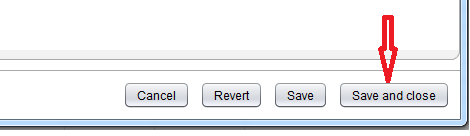
- The custom workflow is now ready to run. Click the
Save and closebutton in the bottom pane :

Execute the Custom Workflow
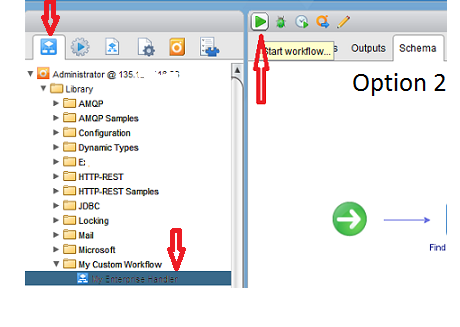
- There are 2 options for executing the custom workflow from the menu. For option 1, select your custom workflow from the
Workflowsleft pane, right-click and then click theStart workflow ...item from the pop-up menu. For option 2, select your custom workflow, and then click the green arrow along the top menu :


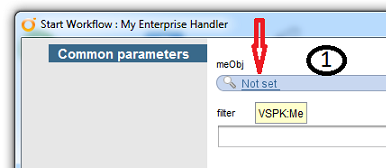
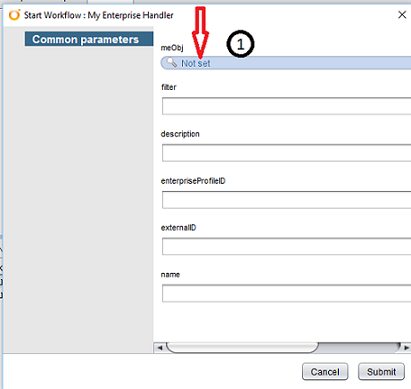
- A pop-up window appears into which 2 parameters required by the custom workflow can be entered. The first required parameter is a
Meobject value. Click theNot setvalue for theMeobject ( 1 ). Another pop-up window appears where you can browse the Inventory to locate an availableMeobject ( 2 ) :

- Select your VSD
Sessionand theMeobject ( 3 ). Then click theSelectbutton ( 4 ) :

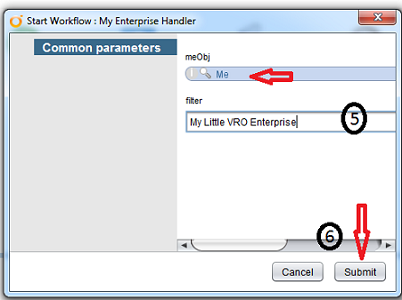
- The first pop-up window reappears and now displays the selected
Meobject. For theFilterparameter, enter valueMy Little VRO Enterprise( 5 ) and click theSubmitbutton ( 6 ) :
- The custom workflow will begin execution and run for a few seconds. Select the
Logsoption in the bottom pane ( 7 ). Note that the ID value from your enterprise object is shown in the console and matches the ID shown earlier :

Expand the Custom Workflow to Edit the Enterprise
In this section, we will expand the custom workflow to include an additional out-of-the-box workflow to illustrate how to edit some of the attributes of a VSD Enterprise object.
Add the 2nd Workflow Element - Editing an Enterprise
- From the
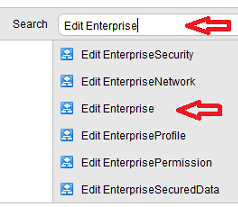
Schematab of the workflow editor, select theGenericmenu in the left pane. Drag theWorkflow elementfrom the group of Generic elements in the left pane to the workflow diagram in the right pane and release it between theScriptable taskelement andEndelement. When prompted for a Workflow name in the Search box, enter part or all of the stringEdit Enterpriseand then double-click the workflow from the list to add it to the schema :
- Hover your mouse over the
Edit EnterpriseWorkflow element to confirm details such as name and path :
- The
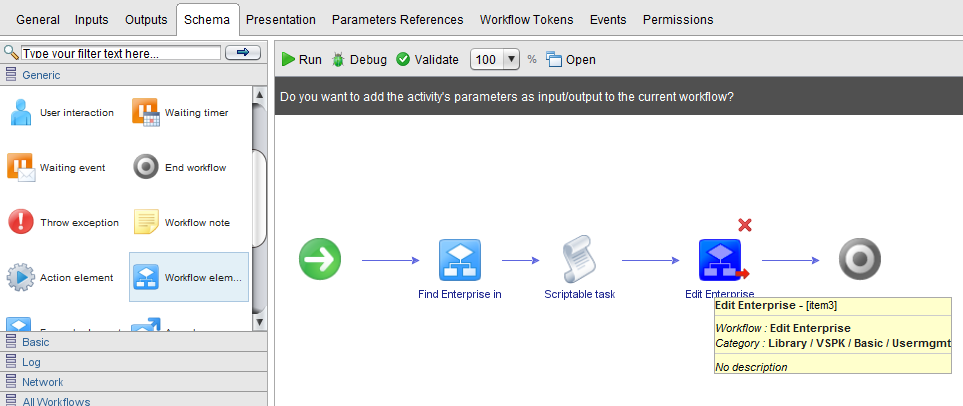
Edit Enterpriseworkflow element that we are adding requires 5 input parameters. In response to the promptDo you want to add the activity's parameters as input/output to the current workflow, click on theSetupbutton. A pop-up screen will be displayed showing the types and names of the 5 parameters. Click on thePromotebutton to accept the default promotion behavior for all parameters :
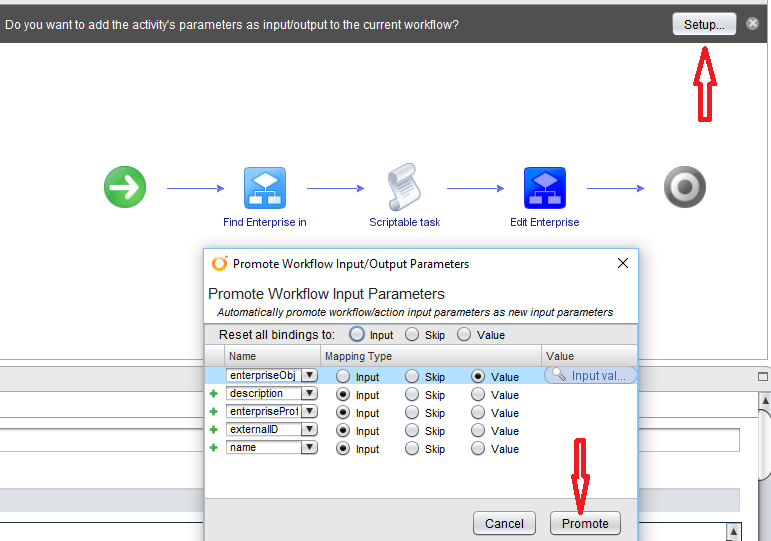
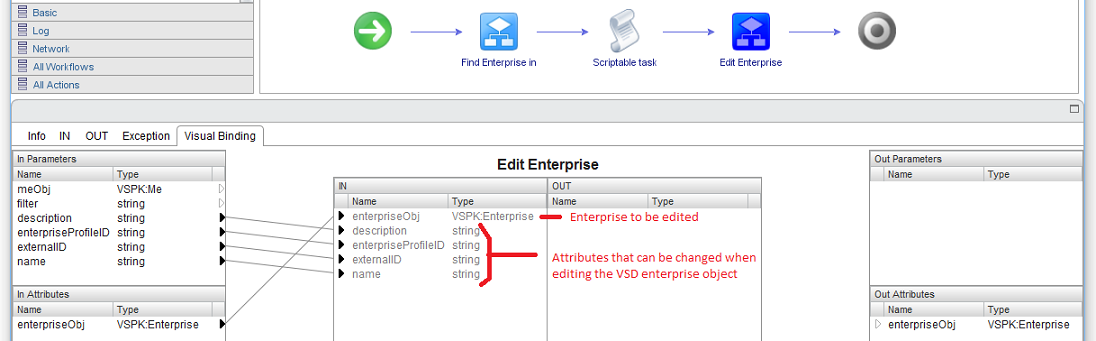
- After promoting all of the parameters used by the
Edit Enterpriseworkflow element, theVisual Bindingpane opens at the bottom of the screen. It indicates that the Enterprise object to be edited will be the same object located by theFind Enterprise in Meelement and that there are 4 other inputs to theEdit Enterpriseelement representing 4 potential attributes that can be modified :
Add the 2nd Scriptable Task Element - Output Revised Enterprise Name
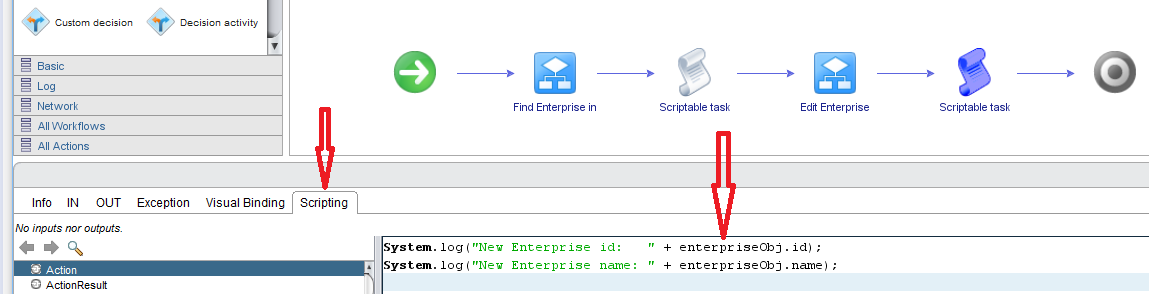
- The purpose of the
Edit Enterpriseworkflow element is to modify some of the attributes for a given VSD Enterprise object. We will now include more JavaScript code to output a revisedNameattributes for that Enterprise object. Drag theScriptable taskelement from the group of Generic elements in the left pane to the workflow diagram in the right pane and release it between theEdit Enterpriseelement andEndelement :

- The screen will open additional panes at the bottom where you will be able to add JavaScript code. Select the
Scriptingmenu option and enter the code as shown :
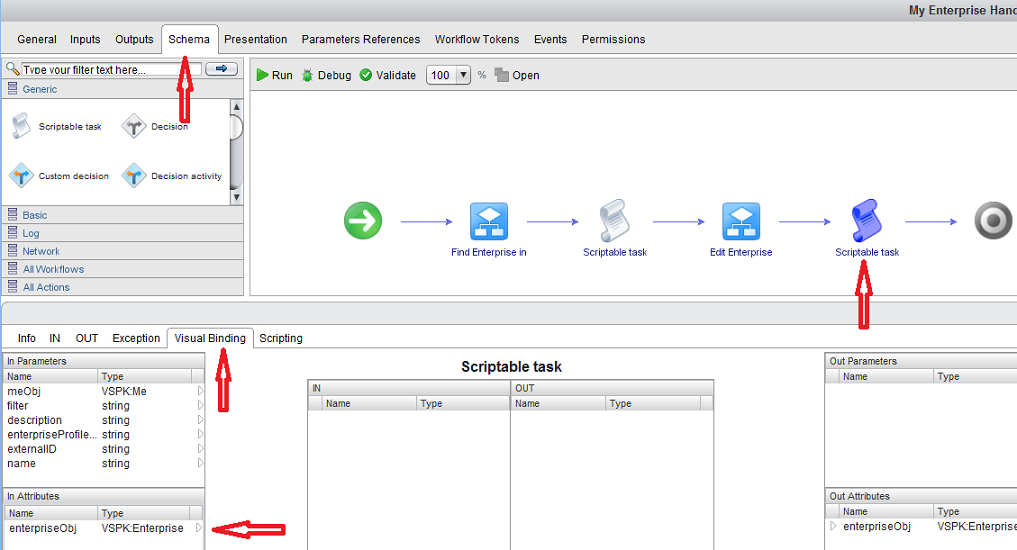
- To edit the same Enterprise object as the one located by the
Find Enterprise in Meworkflow element, you need to wire the object to the second Scriptable Task. From the top-level menu, select theSchemaoption and then click the secondScriptable taskelement. In the bottom pane, select theVisual Bindingoption. TheenterpriseObjparameter is designated as anIn Attributeand can be used as input to the second scriptable task :
- Highlight the attribute and drag it from the
In Attributespanel to theINside of theScriptable taskpanel :
Switch to the Scripting tab in the bottom pane. The enterpriseObj is now confirmed to be a valid parameter and its occurrences in the JavaScript code change color :

- The revised custom workflow is now ready to run. Click the
Save and closebutton in the bottom pane :
Execute the Revised Custom Workflow
- There are 2 options for executing the custom workflow from the menu. For option 1, select your custom workflow from the
Workflowsleft pane, right-click and then click theStart workflow ...item from the pop-up menu. For option 2, select your custom workflow, and then click the green arrow along the top menu :

- A pop-up window appears into which the parameters referenced by the revised custom workflow can be entered. There are now 6 possible input parameters. The first two are used by the first workflow element and the last four are the enterprise attributes that can be modified by the second workflow element. The first required parameter is the same
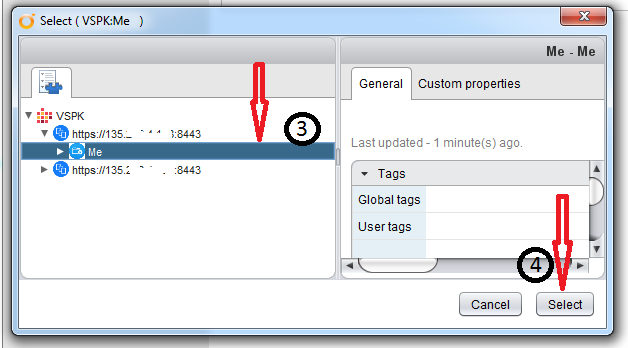
Meobject value that you selected previously. Click theNot setvalue for theMeobject ( 1 ). Another pop-up window will appear where you can browse the Inventory to locate an availableMeobject ( 2 ) :

- Select your VSD
Sessionand theMeobject ( 3 ). Then click theSelectbutton ( 4 ) :

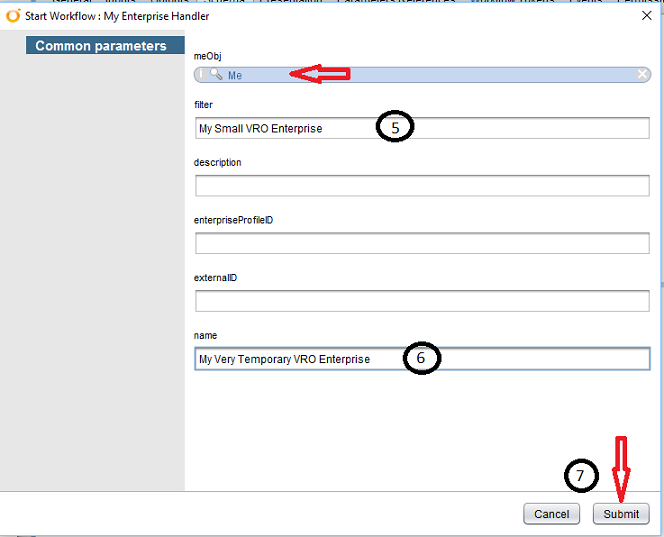
- The first pop-up window reappears and now displays the selected
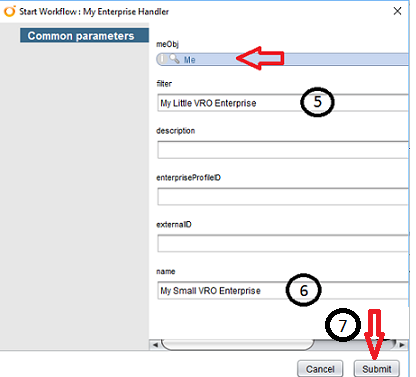
Meobject. For theFilterparameter, enter valueMy Little VRO Enterprise( 5 ). For the set of 4 Enterprise attribute parameters, leave the first 3 of them empty and enter valueMy Small VRO Enterprisefor thenameparameter ( 6 ). Then click theSubmitbutton ( 7 ) :
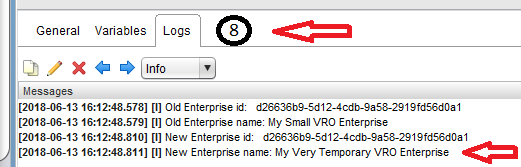
- The revised custom workflow will execute for a few seconds. Select the
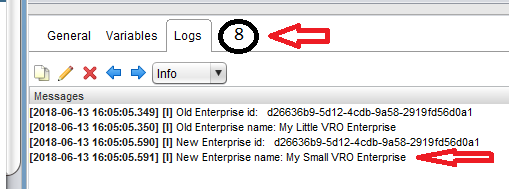
Logsoption in the bottom pane ( 8 ). Note that in the log we see that the ID for our enterprise has not changed but the name has been revised :
Expand the Custom Workflow to Remove the Enterprise
In this section, we will add a final workflow element to the custom workflow to demonstrate how to remove a VSD Enterprise object.
Add the 3rd Workflow Element - Removing an Enterprise
- From the
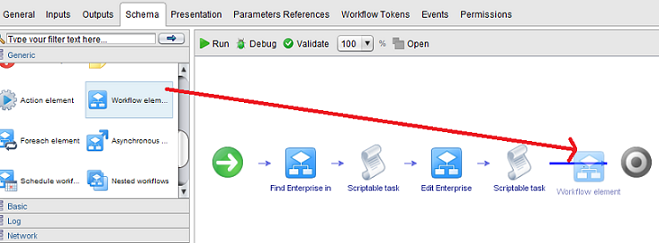
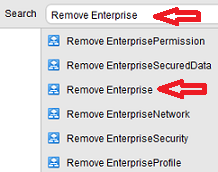
Schematab of the workflow editor, select theGenericmenu in the left pane. Drag theWorkflow elementfrom the group of Generic elements in the left pane to the workflow diagram in the right pane and release it between the secondScriptable taskelement andEndelement. When prompted for a Workflow name in the Search box, enter part or all of the stringRemove Enterpriseand then double-click the workflow from the list to add it to the schema. Hover your mouse over the element to confirm details such as name and path :
- Hover your mouse over the
Remove EnterpriseWorkflow element to confirm details such as name and path :
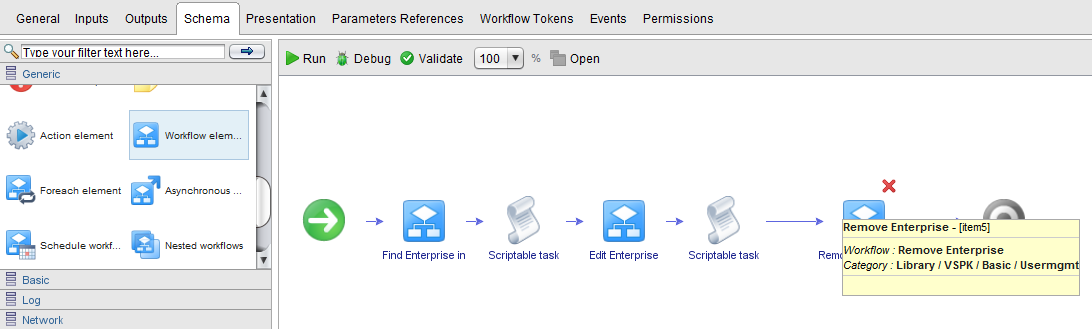
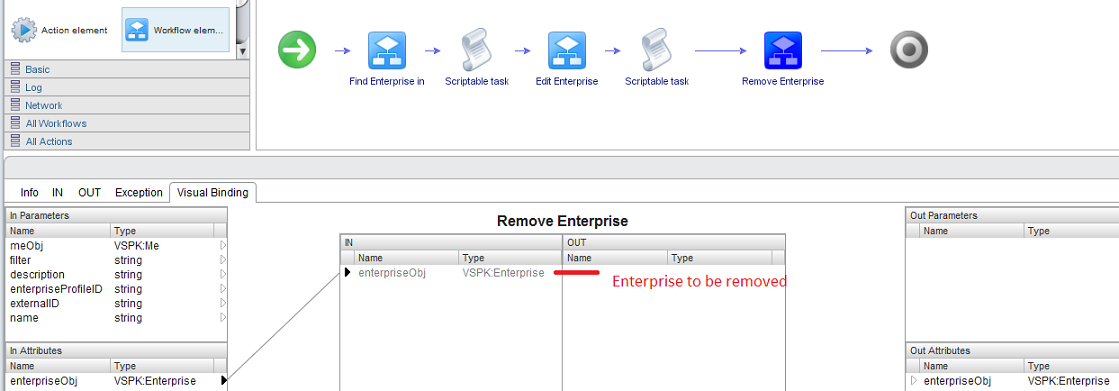
- The
Remove Enterpriseworkflow element that we are adding requires 1 input parameter which is the Enterprise object to be removed. Open theVisual Bindingpane open at the bottom of the screen. It shows that the Enterprise object attribute has already been linked to the input parameter for the new workflow, indicating that the Enterprise object to be removed will be the same object processed by the other workflow elements :
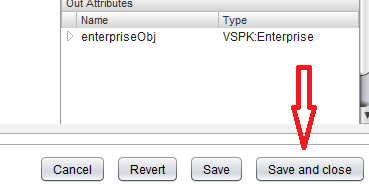
- The revised custom workflow is now ready to run. Click the
Save and closebutton in the bottom pane :
Execute the Final Custom Workflow
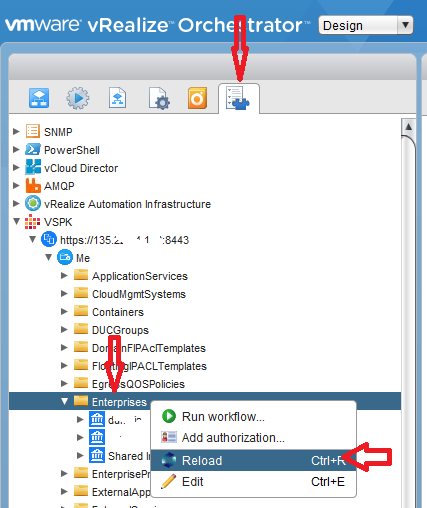
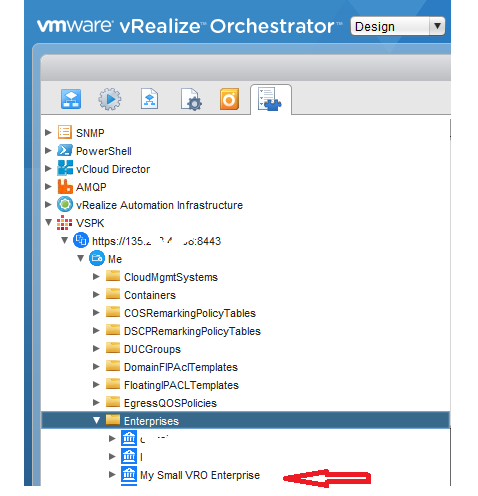
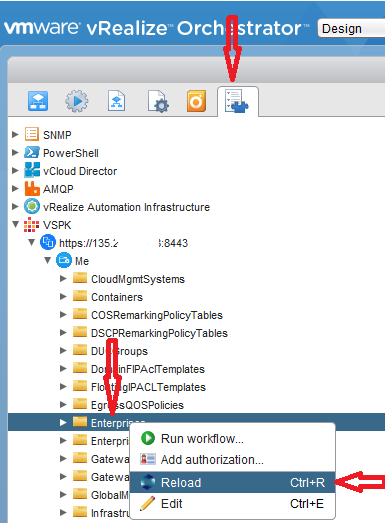
- Before executing the workflow, verify that the enterprise is still visible as an object in the VRO Inventory. Expand the
Meobject from the Inventory menu and then right-click theEnterprisesobject and select theReloadoption from the small pop-up menu. The most recent list of Enterprise objects from your instance of VSD will be displayed. You should see that the enterprise still exists and is namedMy Small VRO Enterprise:
- There are 2 options for executing the final custom workflow from the menu. For option 1, select your custom workflow from the
Workflowsleft pane, right-click and then click theStart workflow ...item from the pop-up menu. For option 2, select your custom workflow, and then click the green arrow along the top menu :


- A pop-up window appears into which the parameters referenced by the final custom workflow can be entered. There are still the same 6 possible input parameters as before. The first required parameter is the same
Meobject value that you selected previously. Click theNot setvalue for theMeobject ( 1 ). Another pop-up window will appear where you can browse the Inventory to locate an availableMeobject ( 2 ) :

- Select your VSD
Sessionand theMeobject ( 3 ). Then click theSelectbutton ( 4 ) :
- The first pop-up window reappears and now displays the selected
Meobject. For theFilterparameter, enter valueMy Small VRO Enterprise( 5 ). For the set of 4 Enterprise attribute parameters, leave the first 3 of them empty and enter valueMy Very Temporary VRO Enterprisefor thenameparameter ( 6 ). Then click theSubmitbutton ( 7 ) :
- The final custom workflow will execute for a few seconds. Select the
Logsoption in the bottom pane ( 8 ). The log content will resemble that of the prior workflow execution :
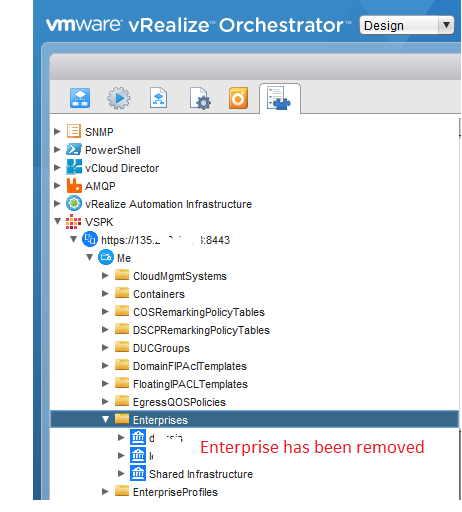
- After executing the workflow, verify that the enterprise is no longer visible as an object in the VRO Inventory. Expand the
Meobject from the Inventory menu and then right-click theEnterprisesobject and select theReloadoption from the small pop-up menu. The most recent list of Enterprise objects from your instance of VSD will be displayed. Note that the enterprise no longer exists :
Conclusion
In this part of our VRO series, we introduced the Nuage Networks VSP vRO Plugin and walked through some basic examples of how you can use it to manage your VSD objects. In Part 2, we will discuss how VSD objects can be referenced by the Nuage Plugin using Actions (custom Javascript functions) and Configuration Elements (VRO server-wide constants).